There are many reasons why you may need to expand Proxmox VM Storage. It is always challenging to grow a VM’s virtual disk in Proxmox. The process requires several steps. Mistakes can result in the loss of data. The video above provides an easy-to-understand guide on how to expand a VM disk.
Before beginning, your should make a backup. It also helps to format your VM disks using LVM thin provisioning.
We have built a Proxmox single-node using an AMD NUC computer for testing and learning purposes. The hardware configuration for this system is as follows:
GMKtec K8 Plus Mini PC, AMD Ryzen 7 8845HS processor with 8 C/ 16T, up to 5.1GHz with 1 TB MVNe SSD
2 TB NVMe – ZFS Formatted pool named zfsa, mount point zfsa_mp
Networking Configuration
Virtual Bridge
Purpose
VLAN
Speed
Adapter
vmbr0 (Mgmt)
Proxmox Management
Computers
2.5 GbE
LAN #2 on NUC
vmbr1 (LS Svcs)
Low-Speed Services
All VLANs
500 Mbps
LAN #1 on NUC
vmbr2 (HS Svcs)
High-Speed Services
All VLANs
2.5 GbE
USB-C Adapter #1
vmbr3 (Storage)
HA Storage for VMs/LXCs
Storage
2.5 GbE
USB-C Adapter #2
The Networking configuration on our test node mirrors the setup in our Production Cluster. The table above outlines the Test Node networking setup. We could not configure one of the ports on the host system to operate above 500 Mbps.
Storage Configuration
Proxmox Test Node Storage Configuration
The table above shows the storage configuration for our Test Node. NUC-storage is implemented on our high-availability NAS. Access is provided to both the Production Cluster and NUC Proxmox Backup Server datastores (more info here).
Proxmox Backup Server Configuration
Backups for our Test Node mirror the configuration and scheduling of Backups on our production Cluster (more info here).
Additional Configuration
The following additional items are configured for our test node:
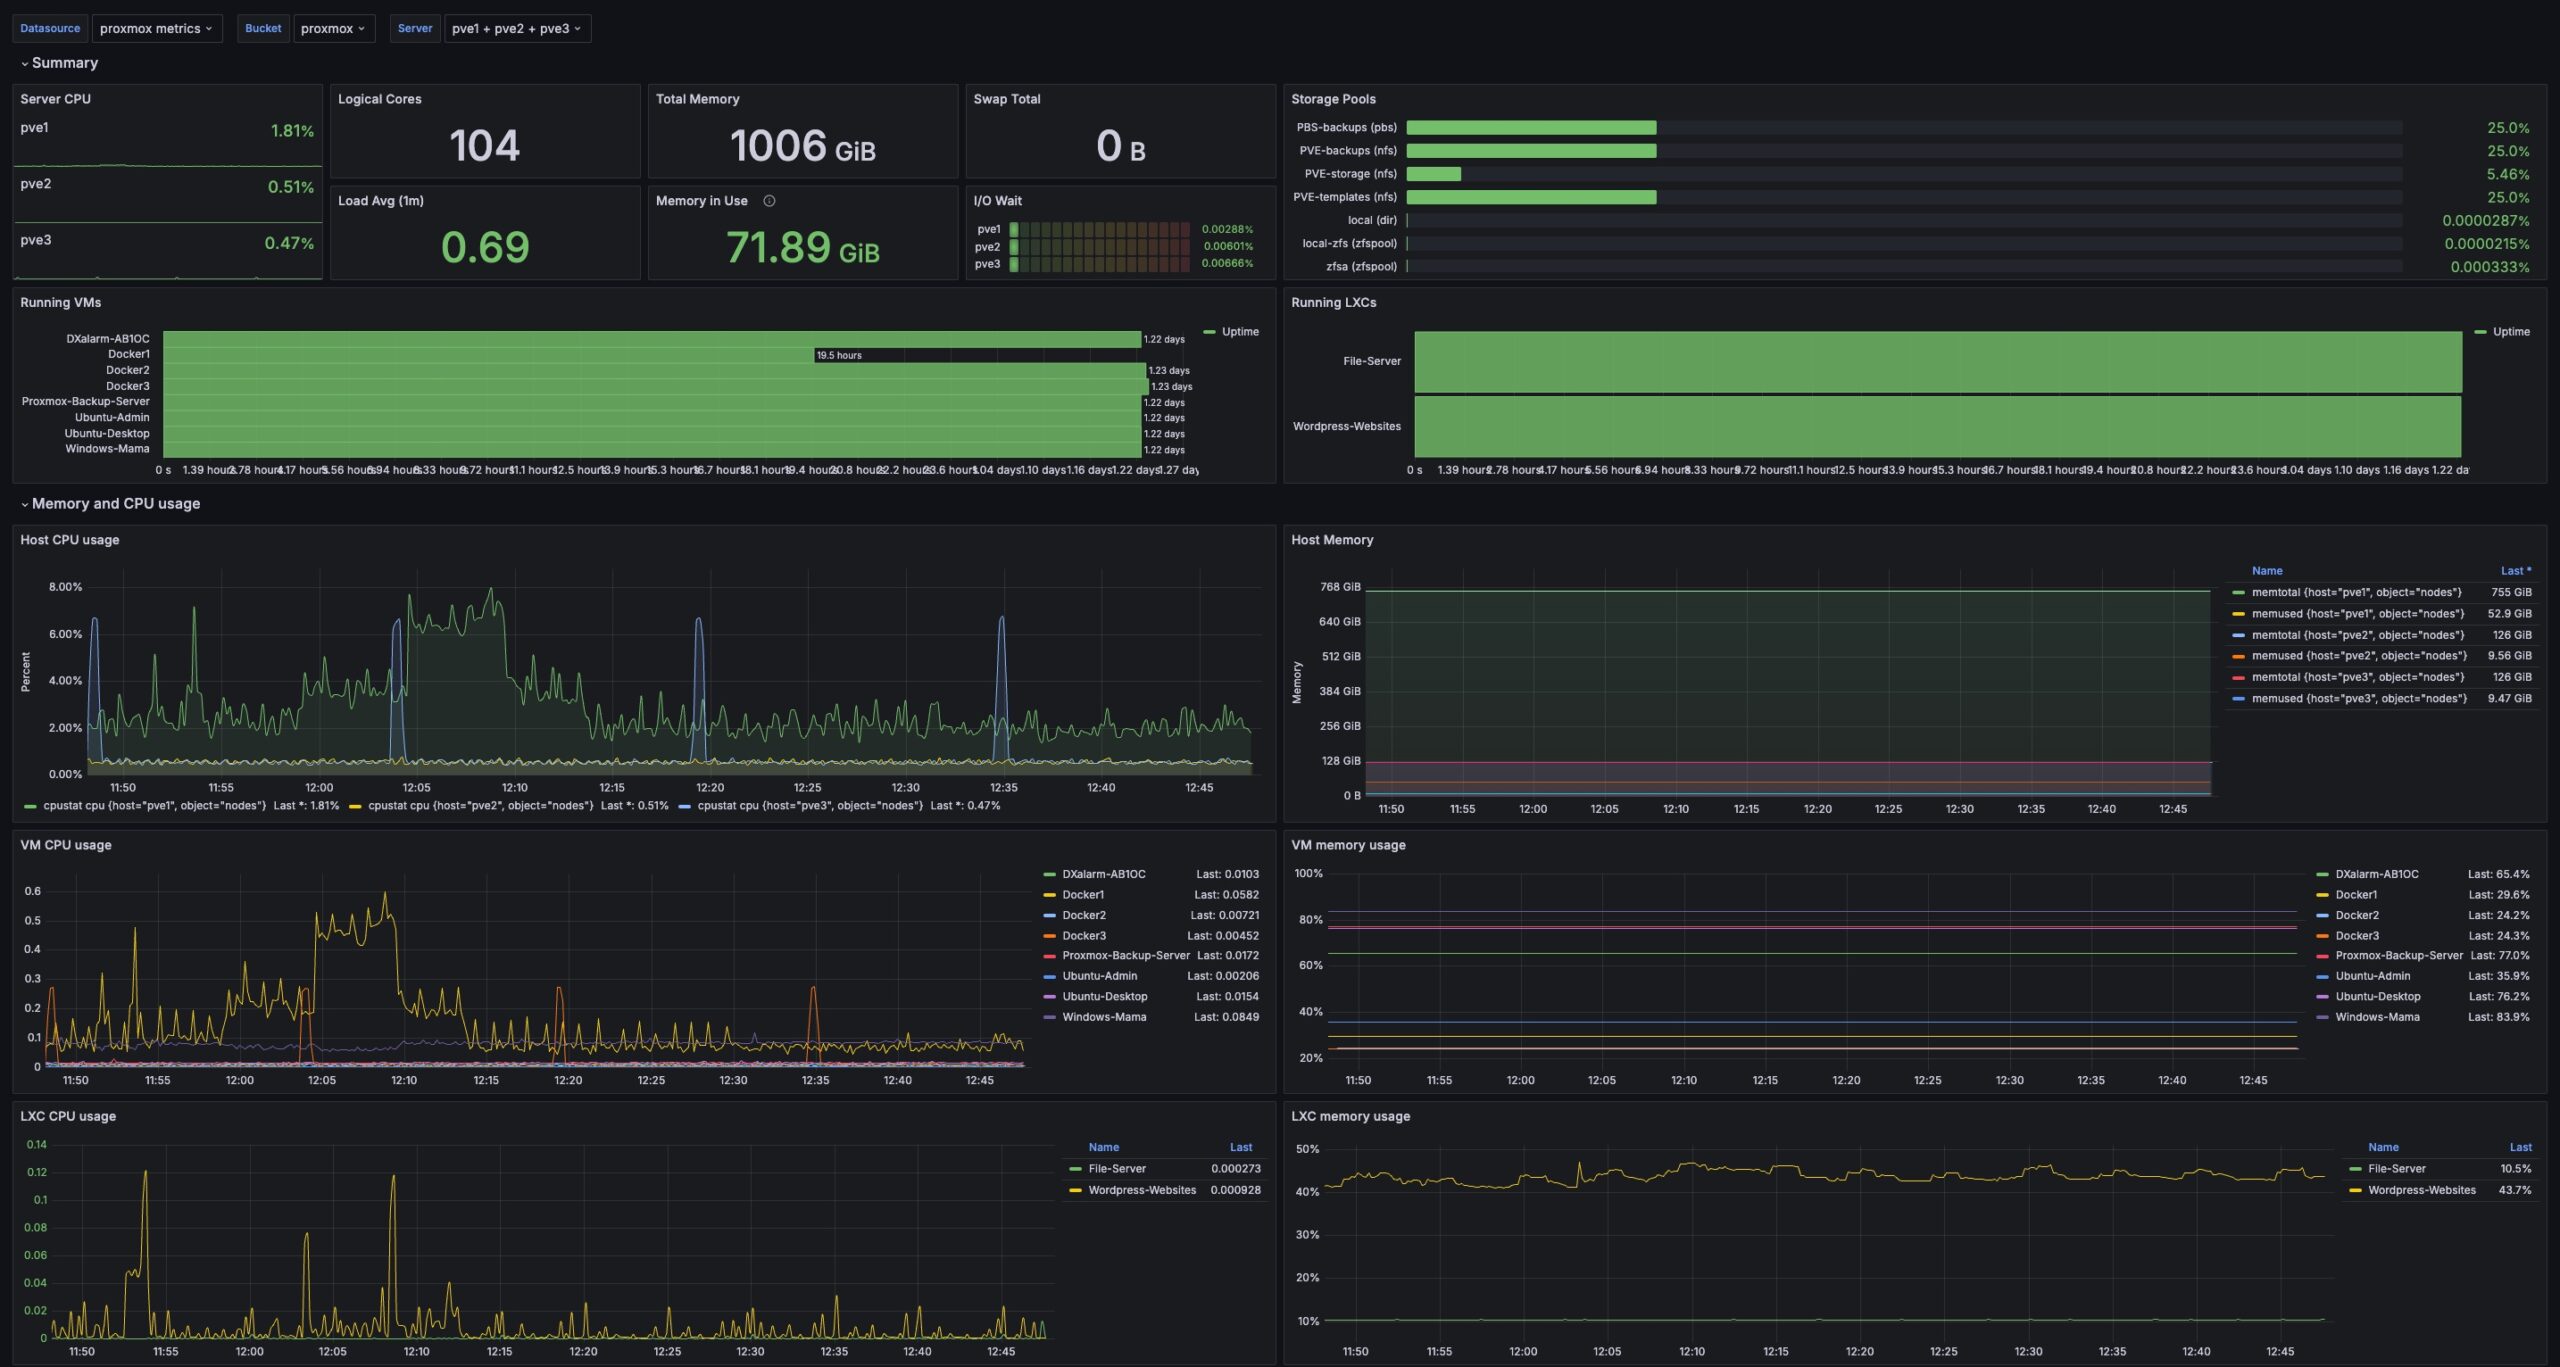
The following sections cover the setup and configuration of our monitoring stack.
Proxmox Monitoring Setup
The following video explains how to set up a Grafana dashboard for Proxmox. This installation uses the monitoring function built into Proxmox to feed data to Influx DB.
And here is a video that explains setting up self-signed certificates –
This page covers the installation of the Proxmox Backup Server (PBS) in our HomeLab. We run the PBS in a VM on our server and store backups in shared storage on one of our NAS drives.
Make the NAS share mount permanent by adding it to /etc/fstab
vi /etc/fstab
...after the last line add the following line
# Mount PBS backup store from NAS
//nas-#.anita-fred.net/PBS-backups /mnt/pbs-store cifs vers=3.0,credentials=/etc/samba/.smbcreds,uid=backup,gid=backup,defaults 0 0
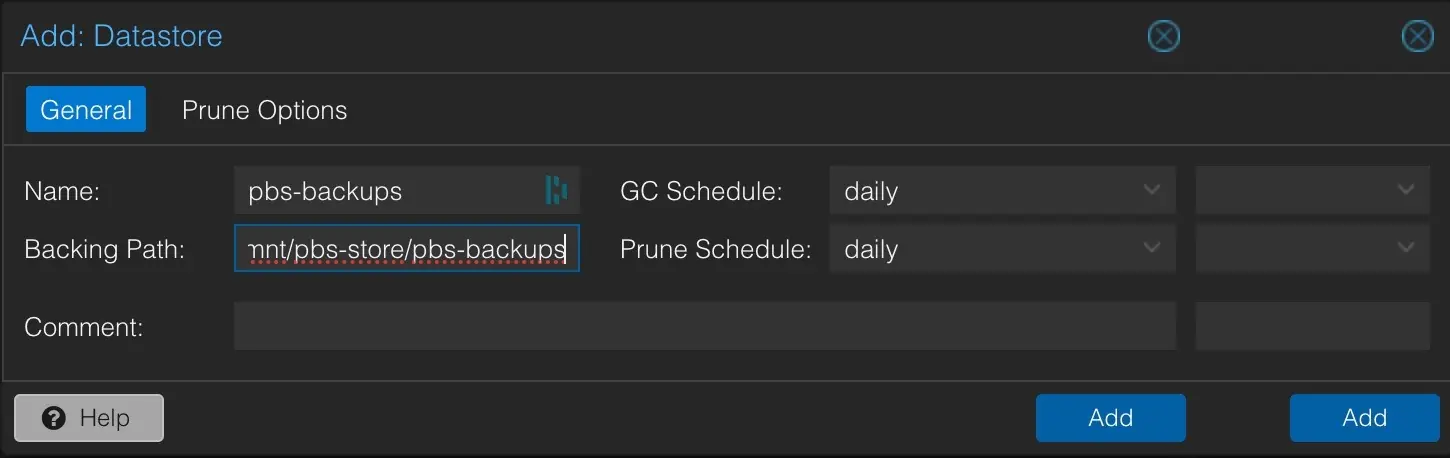
Create a datastore to hold the PBS backups in the Proxmox Backup Server as follows. The datastore will take some time to create (be patient).
PBS Datastore Configuration
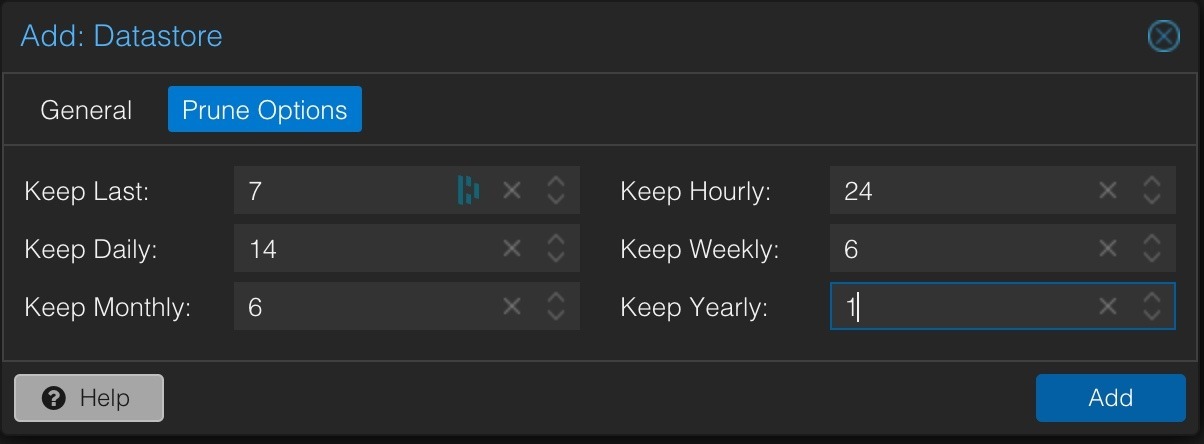
PBS Datastore Prune Options
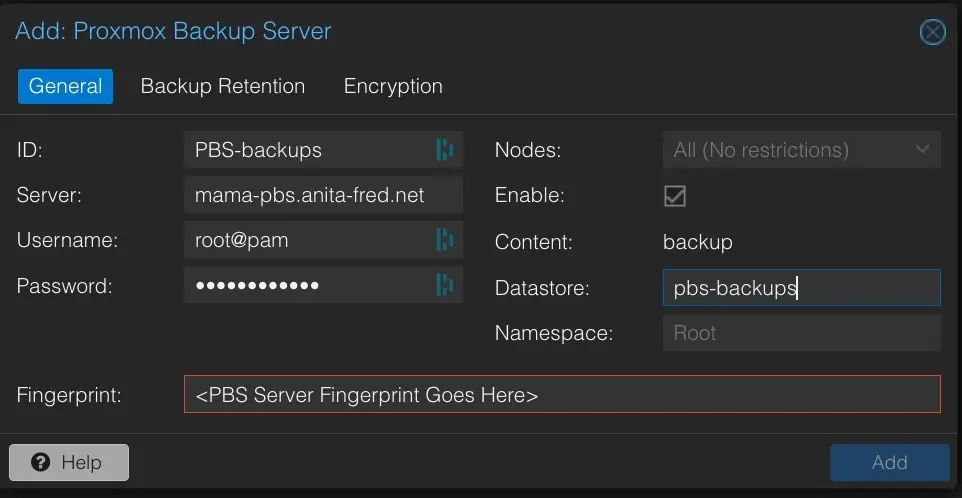
Add the PBS store as storage at the Proxmox datacenter level. Use the information from the PBS dashboard to set the fingerprint.
PBS Storage in Proxmox VE
The PBS-backups store can now be used as a target in Proxmox backups. NOTE THAT YOU CANNOT BACK UP THE PBS VM TO PBS-BACKUPS.
The NFS share for the Proxmox Backup store needs time to start before the Backup server starts on boot. This can be set for each node under System/Options/Start on Boot delay. A 30-second delay seems to work well.
Setup Backup, Pruning, and Garbage Collection
The overall schedule for Proxmox backup operations is as follows:
02:00 – Run a PVE Backup on the PBS Backup Server VM from our Production Cluster (run in suspend mode; stop mode causes problems)
02:30 – Run PBS Backups in all Clusters/Nodes on all VMs and LXCs EXCEPT for the PBS Backup Server VM
03:00 – Run Pruning on the all PBS datastores
03:30 – Run Garage Collection on all PBS datastores
05:00 – Verify all backups in all PBS G
Local NTP Servers
We want Proxmox and Proxmox Backup Server to use our local NTP servers for time synchronization. To do this, modify/etc/chrony/chrony.conf to use our servers for the pool. This must be done on each server individually and inside the Proxmox Backup Server VM. See the following page for details.
Backup Temp Directory
Proxmox backups use vzdump to create compressed backups. By default, backups use /var/tmp, which lives on the boot drive of each node in a Proxmox Cluster. To ensure adequate space for vzdump and reduce the load on each server’s boot drive, we have configured a temp directory on the local ZFS file systems on each of our Proxmox servers. The tmp directory configuration needs to be done on each node in the cluster (details here). The steps to set this up are as follows:
# Create a tmp directory on local node ZFS stores
# (do this once for each server in the cluster)
cd /zfsa
mkdir tmp
# Turn on and verify ACL for ZFSA store
zfs get acltype zfsa
zfs set acltype=posixacl zfsa
zfs get acltype zfsa
# Configure vzdump to use the ZFS tmp dir'
# add/set tmpdir as follows
# (do on each server)
cd /etc
vi vzdump.conf
tmpdir: /zfsa/tmp
:wq
This page covers the Proxmox VE install and setup on our server. You can find a great deal of information about Proxmox in the Proxmox VE Administrator’s Guide.
Proxmox Installation/ZFS Storage
Proxmox was installed on our server using the steps in the following video:
The Proxmox boot images are installed on MVMe drives (ZFS RAID1 on our Dell Sever BOSS Card, or ZFS single on the MNVe drives on our Supermicro Servers). This video also covers the creation of a ZFS storage pool and filesystem. A single filesystem called zfsa was set up using RAID10 and lz4 compression using four SSD disks on each server.
I like to install a few additional tools to help me manage our Proxmox installations. They include the nslookup and ifconfig commands and the tmux terminal multiplexor. The commands to install these tools are found here.
Cluster Creation
With these steps done, we can create a 3-node cluster. See our Cluster page for details.
ZFS Snapshots
Creating ZFS snapshots of the Proxmox installation can be useful before making changes. This enables rollback to a previous version of the filesystem should any changes need to be undone. Here are some useful commands for this purpose:
zfs list -t snapshot
zfs list
zfs snapshot rpool/ROOT/<node-name>@<snap-name>
zfs rollback rpool/ROOT/<node-name>t@<snap-name>
zfs destroy rpool/ROOT/<node-name>@<snap-name>
Be careful to select the proper dataset – snapshots on the pool that contain the dataset don’t support this use case. Also, you can only roll back to the latest snapshot directly. If you want to roll back to an earlier snapshot, you must first destroy all of the later snapshots.
In the case of a Proxmox cluster node, the shared files in the associated cluster filesystem will not be included in the snapshot. You can learn more about the Proxmox cluster file system and its shared files here.
You can view all of the snapshots inside the invisible /.zfs directory on the host filesystem as follows:
# cd /.zfs/snapshot/<name>
# ls -la
Local NTP Servers
We want Proxmox and Proxmox Backup Server to use our local NTP servers for time synchronization. To do this, we need to modify /etc/chrony/chrony.conf to use our servers for the pool. This needs to be done on each server individually and inside the Proxmox Backup Server VM. See the following page for details.
The first step before following the configuration procedures above is to install chrony on each node –
apt install chrony
Mail Forwarding
We used the following procedure to configure postfix to support forwarding e-mail through smtp2go. Postfix does not seem to work with passwords containing a $ sign. A separate login was set up in smtp2go for forwarding purposes.
Some key steps in the process include:
# Install postfix and the supporting modules
# for smtp2go forwarding
sudo apt-get install postfix
sudo apt-get install libsasl2-modules
# Install mailx
sudo apt -y install bsd-mailx
sudo apt -y install mailutils
# Run this command to configure postfix
# per the procedure above
sudo dpkg-reconfigure postfix
# Use a working prototype of main.cf to edit
sudo vi /etc/postfix/main.cf
# Setup /etc/mailname -
# use version from working server
# MAKE SURE mailname is lower case/matches DNS
sudo uname -n > /etc/mailname
# Restart postfix
sudo systemctl reload postfix
sudo service postfix restart
# Reboot may be needed
sudo reboot
# Test
echo "Test" | mailx -s "PVE email" <email addr>
vGPU
Our servers each include a Nvidia TESLA P4 GPU. This GPU is sharable using Nvidia’s vGPU. The information on how to set up Proxmox for vGPU may be found here. This procedure also explains how to enable IOMMU for GPU pass-through (not sharing). We do not have IOMMU setup on our servers at this time.
You’ll need to install the git command and the cc compiler to use this procedure. This can be done with the following commands –
Now you can follow the procedure here. Be sure to include the steps to enable IOMMU. I downloaded and installed the 6.4 vGPU driver from the Nvidia site and did a final reboot of the server.
vGPU Types
The vGPU drivers support a number of GPU types. You’ll want to select the appropriate one in each VM. Note that multiple sizes of vGPUs are not allowed (i.e., if one GPU uses 2 GB of memory, all must). The following table shows the types available. (this data can be obtained by running mdevctl types on your system).
Q Profiles - Not Good for OpenGL/Games
vGPU Type
Name
Memory
Instances
nvidia-63
GRID P4-1Q
1 GB
8
nvidia-64
GRID P4-2Q
2 GB
4
nvidia-65
GRID P4-4Q
4 GB
2
nvidia-66
GRID P4-8Q
8 GB
1
A Profiles - Windows VMs
vGPU Type
Name
Memory
Instances
nvidia-67
GRID P4-1A
1 GB
8
nvidia-68
GRID P4-2A
2 GB
4
nvidia-69
GRID P4-4A
4 GB
2
nvidia-70
GRID P4-8A
8 GB
1
B Profiles - Linux VMs
vGPU Type
Name
Memory
Instances
nvidia-17
GRID P4-1B
1 GB
8
nvidia-243
GRID P4-1B4
1 GB
8
nvidia-157
GRID P4-2B
2 GB
4
nvidia-243
GRID PR-2B4
2 GB
4
Disabling Enterprise Repository
Proxmox No Subscription Repositories
We recommend purchasing at least a Community Support License for production Proxmox servers. We are running some test servers here and we have chosen to use the No Subscription repositories for these systems. The following videos explain how to configure the No Subscription repositories. These procedures work with Proxmox 8.3.
I have occasionally seen problems with the SSH keys getting out of date on our servers. The fix for this is to run the following commands on all of the servers. A reboot is also sometimes necessary.
# Update certs and repload PVE proxy
pvecm updatecerts -F && systemctl restart pvedaemon pveproxy
# Reboot if needed
reboot