Tag Archives: Docker

Raspberry Pi – Docker and PiHole

PiHole in Docker

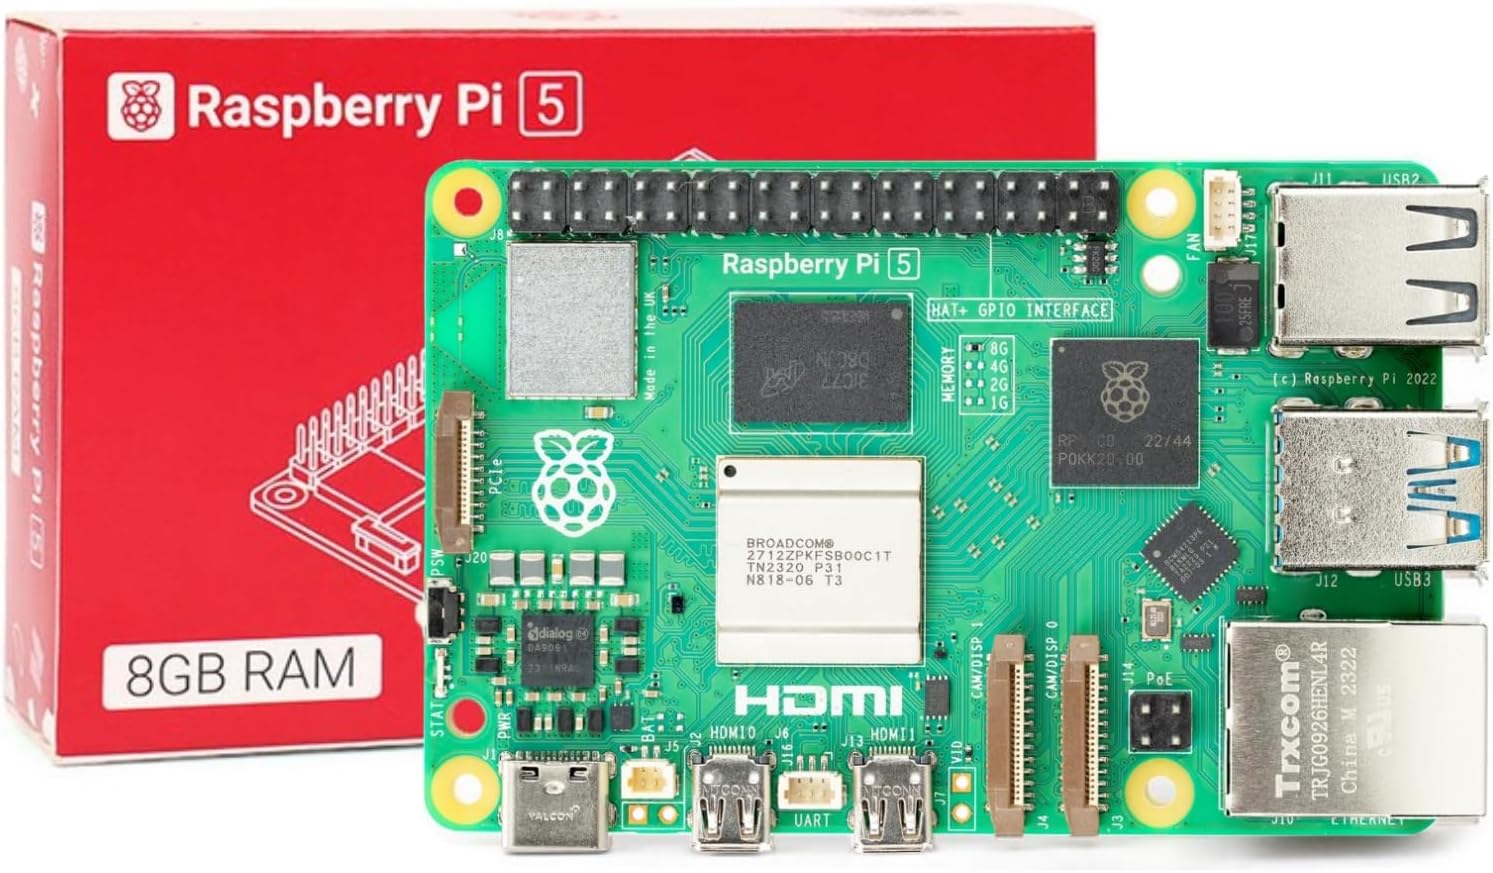
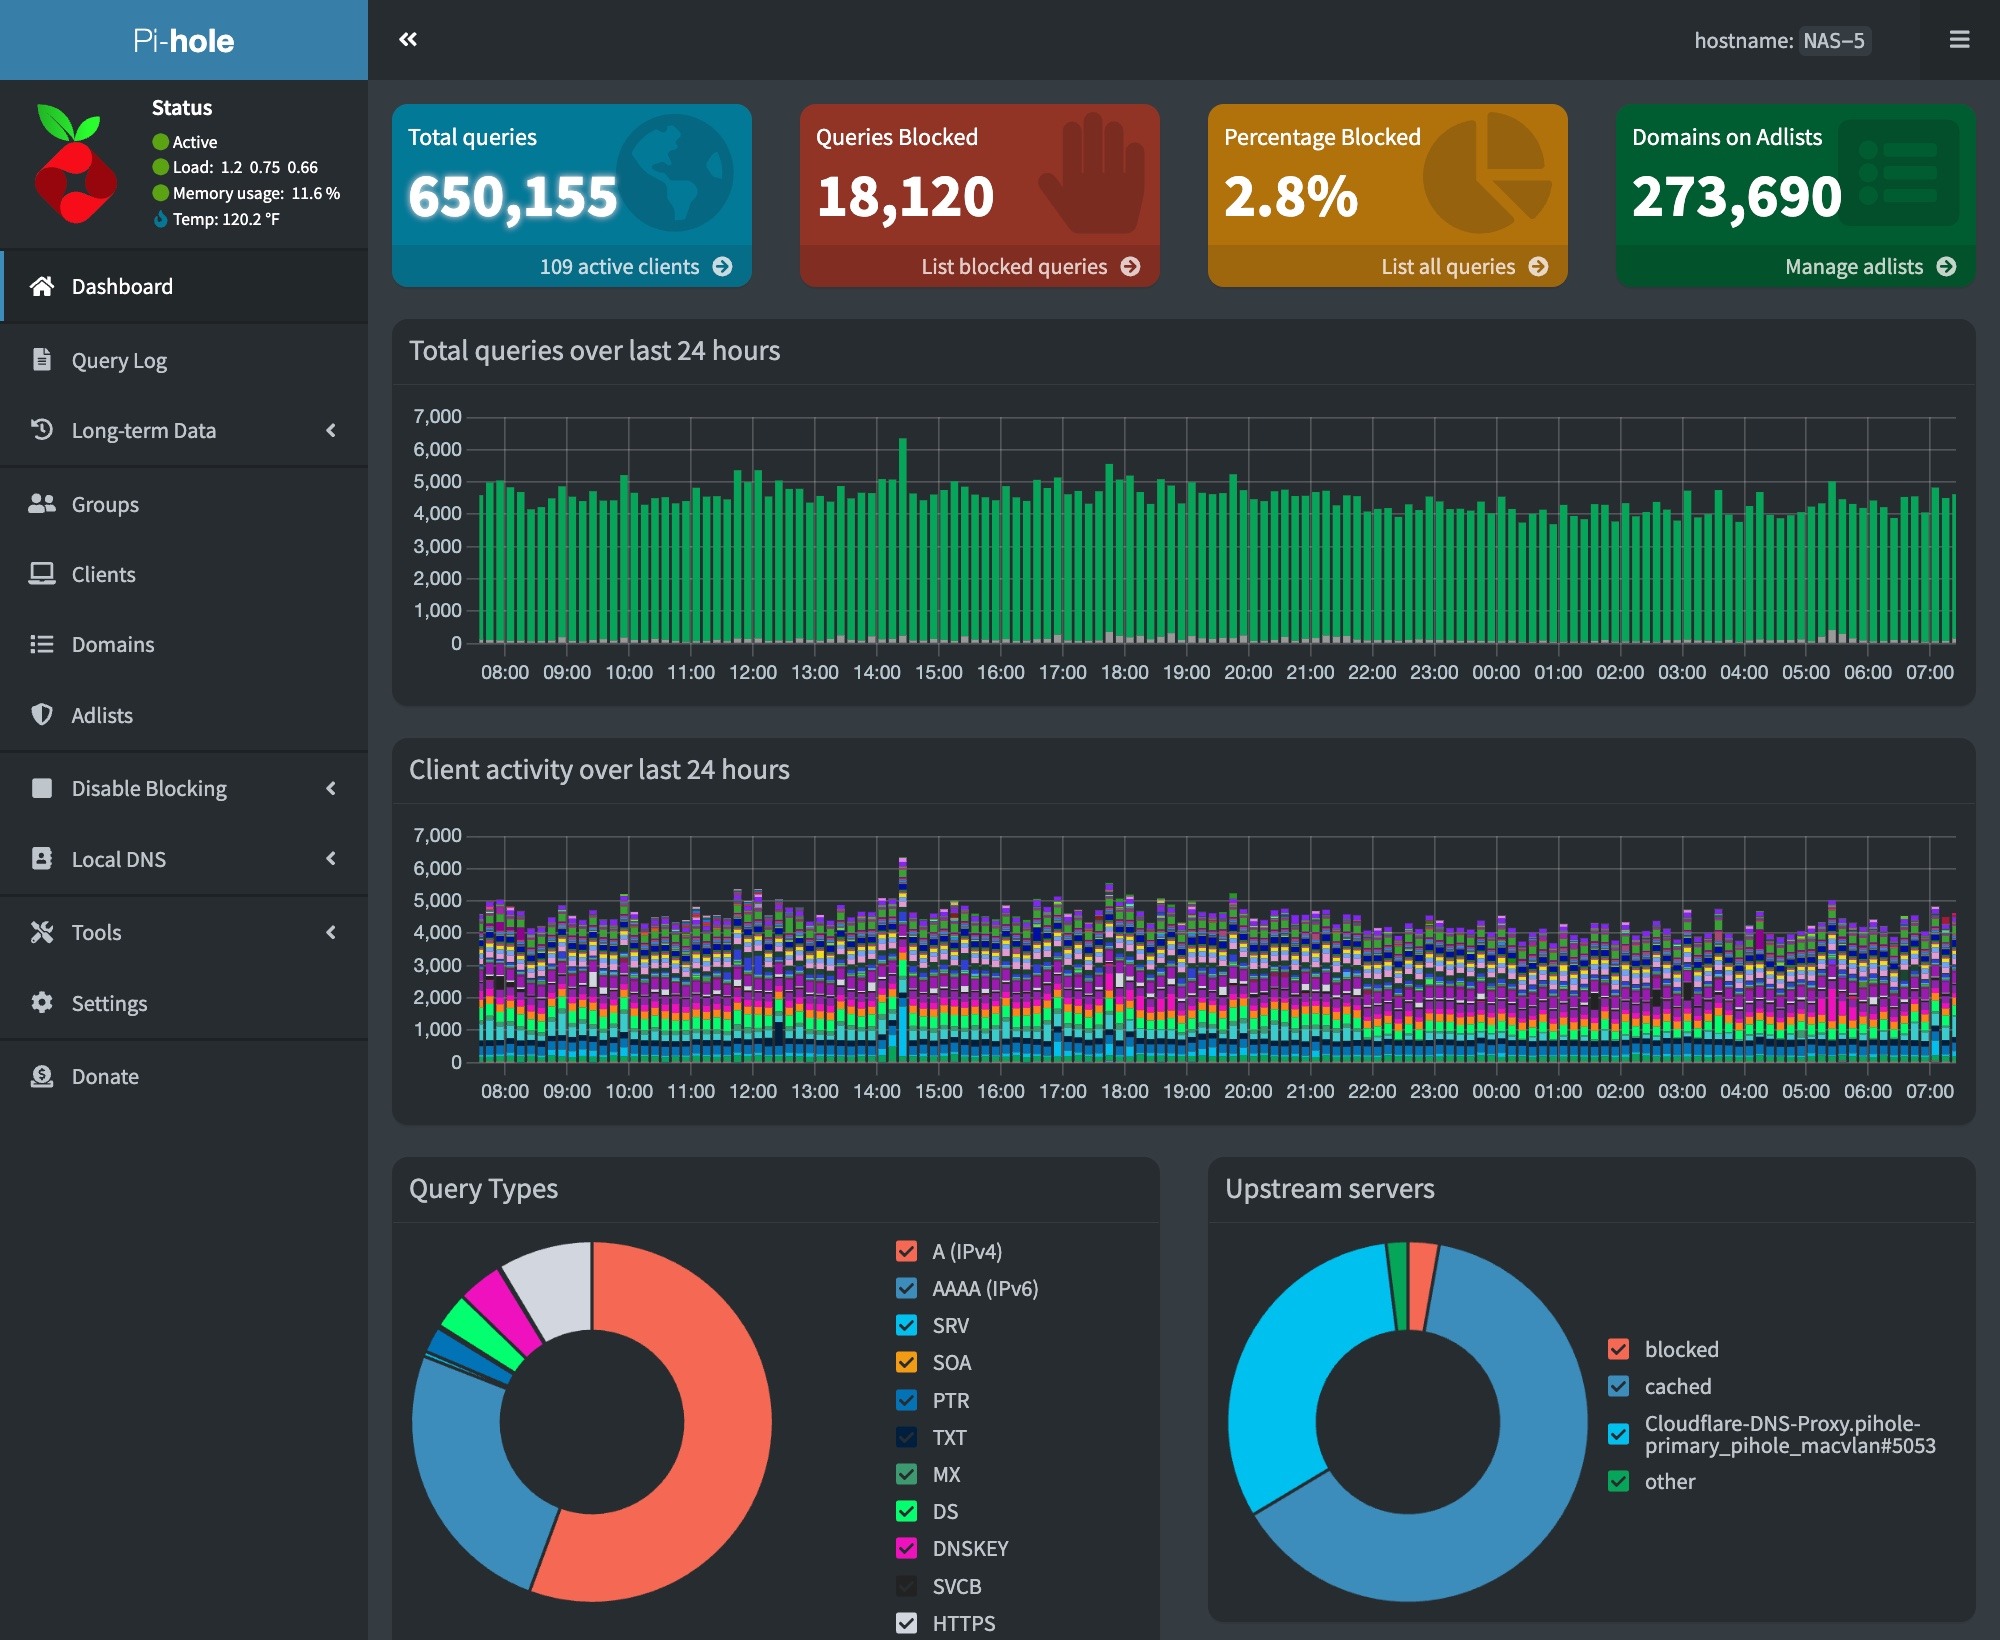
We have set up a Raspberry Pi 5 system to run a third PiHole DNS server in our network. This ensures that DNS services are available even if our other servers are down.

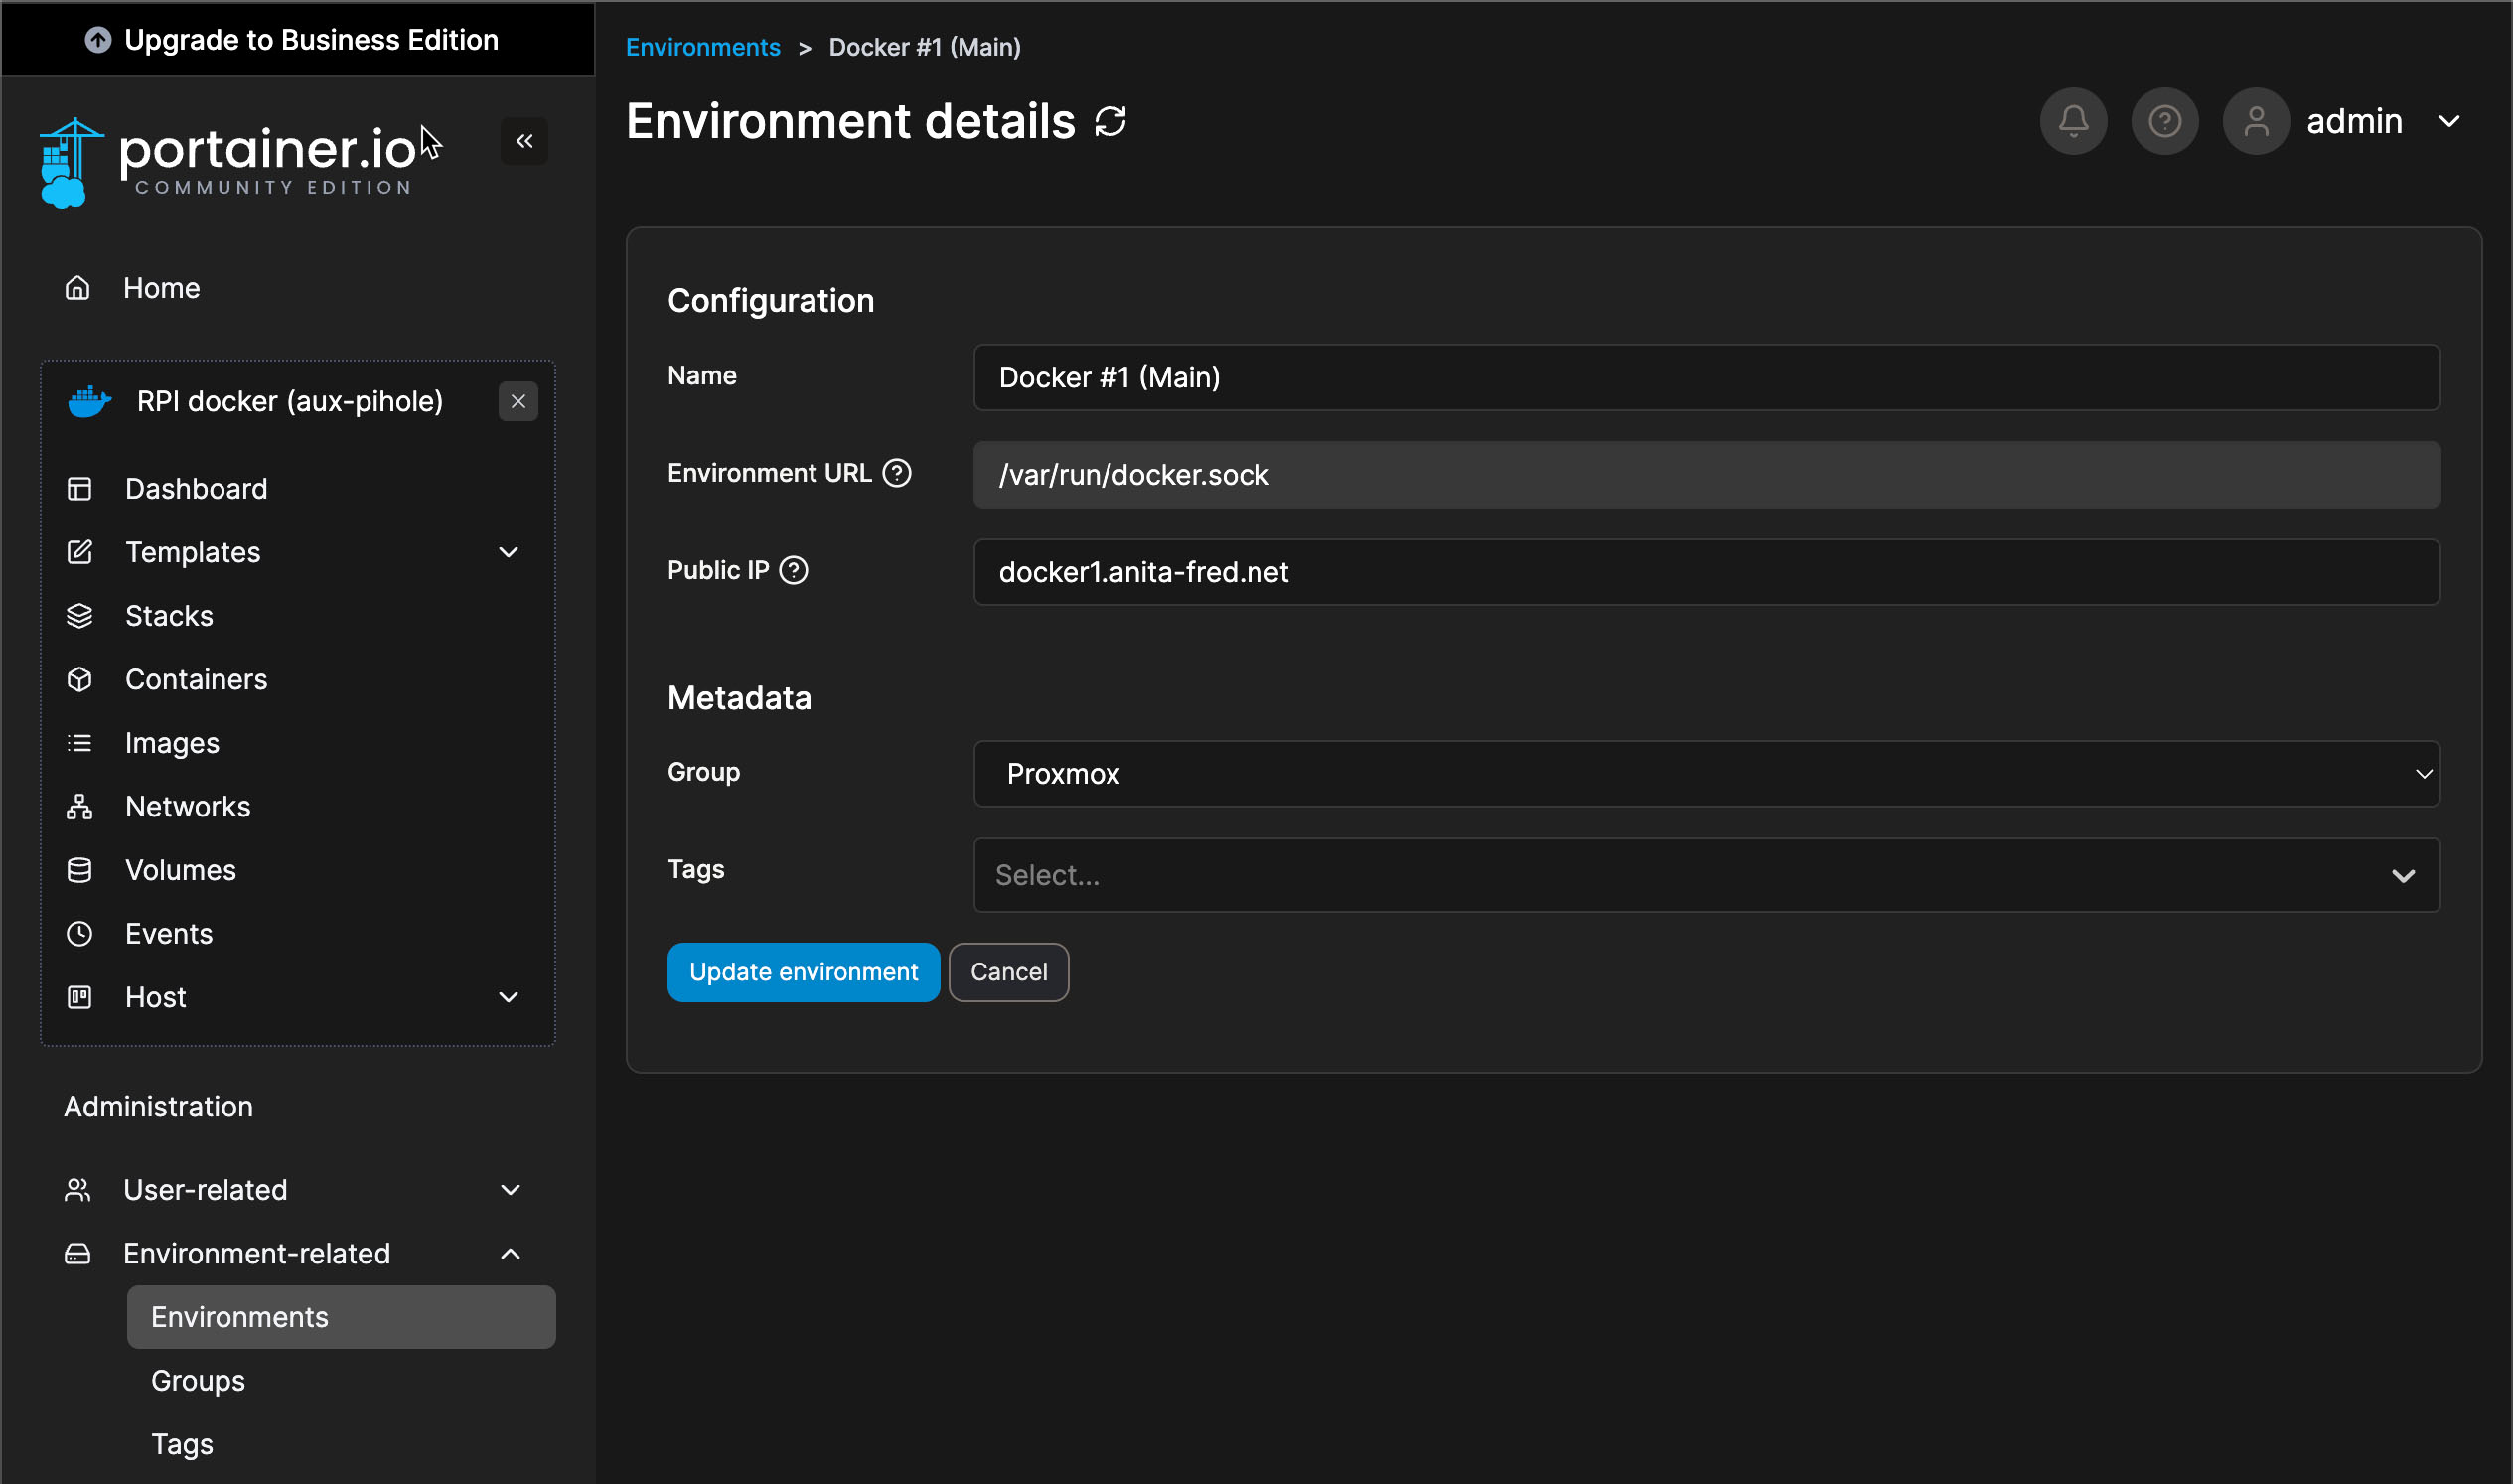
To make this PiHole easy to manage, we configured our Raspberry Pi to run Docker. This enables us to manage the PiHole installation on the Pi from the Portainer instance used to manage our systems running docker.

We are also running the Traefik reverse proxy. Traefik is used to provide an SSL certificate for our PiHole.

Raspberry Pi Hardware

Raspberry Pi Docker Host

Our docker host consists of a PoE-powered Raspberry Pi 5 system. The hardware components used include:

OS Installation

We are running the 64-bit Lite version (no GUI desktop) of Raspberry Pi OS. The configuration steps on the initial boot include:

  • Setting the keyboard layout to English (US)
  • Setting a unique user name
  • Setting a strong password

After the system is booted, we used sudo raspi-config to set the following additional options:

  • Updated raspi-config to the latest version
  • Set the system’s hostname
  • Enable ssh
  • Set the Timezone
  • Configure predictable network names
  • Expand the filesystem to use all of the space on our flash card

Next, we did a sudo apt update && sudo apt dist-upgrade to update our system and rebooted.

The RPi 5 works well with the PoE HAT we are using. The RPi5  booted up with the USB interfaces in low-power mode. The PoE HAT provides enough power to enable USB boot, so we added the following to bring our RPi up in full power USB mode:

$ sudo vi /boot/firmware/config.txt

[all]
# Enable RPi 5 to provide full power to USB
usb_max_current_enable=1
:wq

# After rebooting, check USB power mode
$ vcgencmd get_config usb_max_current_enable
usb_max_current_enable=1

Finally, we created and ran a script to install our SSH keys on the system, and we verified that SSH access was working. With this done, we ran our ansible configuration script to install the standard set of tools and utilities that we use on our Linux systems.

Mail Forwarding

We will need to forward emails from containers and scripts on the system. To do this, we set up email forwarding using the procedure here.

Docker/Docker Compose Installation

Installing Docker and the Docker Compose plugin involves a series of command line steps on the RPi. To automate this process, we created a script that runs on our Ubunutu Admin server. The steps required for these installations are covered in the following video:


Steps to install Docker and Docker Compose on a Raspberry Pi

Some important adjustments to the steps in the video included:

The installation can be verified at the end with the following commands:

# docker --version
# docker compose version
# docker run hello-world

Portainer Agent

We installed the Portainer Edge agent using the following command, which is run on the RPi:

# docker run -d \
  -p 9001:9001 \
  --name portainer_agent \
  --restart=always \
  -v /var/run/docker.sock:/var/run/docker.sock \
  -v /var/lib/docker/volumes:/var/lib/docker/volumes \
  portainer/agent:2.19.5

The final step is to connect the Edge Agent to our Portainer.

Traefik Reverse Proxy and PiHole with Cloudflare Tunnel

Our software service stack for our Raspberry Pi includes the following applications:

These applications are installed via custom scripts, and Docker Compose using a single stack. Our combined stack was created using a combination of the information in the following videos:


Deploy PiHole with Cloudflare Tunnel in Docker


Deploying Traefik in Docker

Scheduled Block List Updates

We must update our piHole block list by doing a Gravity pull. We do this daily via a cron job. This can be configured on the RPi host using the following commands –

# Edit the user crontab
sudo crontab -u <user-id> -e

# The following to the user crontab
min hr * * * su ubuntu -c /usr/bin/docker exec pihole pihole -g | /usr/bin/mailx -s"RPi Docker - Gravity Pull" your-email@mydomain.com

Cloudflare DDNS

We host our domains externally on Cloudflare. We use Docker containers to keep our external IP address up to date in Cloudflare’s DNS system. You can learn about how to set this up here.

Watchtower

We are running the Watchtower container to keep our containers on our RPi Docker host up to date. You can learn more about Watchtower and how to install it here.

Backups

We back up our Raspberry Pi Docker host using Synology ActiveBackup for business running on one of our Synology NAS drives.

Docker Infrastructure


Docker

We’ve been using Docker hosts and Portainer to run various containerized applications in our Home Lab infrastructure. Our applications have been hosted using a combination of our Synology NAS drives and our Proxmox Cluster.

Getting Started With Docker

The following video provides a good beginner’s overview of Docker and how to get started.


Getting Started With Docker

Architecture

We run our Docker infrastructure using our Proxmox Cluster and a stand-alone Raspberry Pi. We have a total of found Docker hosts in our setup. Three run on top of Ubuntu Server VMs on our Proxmox Cluster, and the fourth runs on a Raspberry Pi using Raspberry Pi OS.

Docker HostRealizationConfigurationHigh-AvailabilityNotes
Docker1Primary Docker Host on PVE18 CPUs, 32 GB Ram, 256 GB StorageVia Proxmox ClusterRun Traefik Rev. Proxy, Portainer, and many containers
Docker2Secondary Docker Host on PVE24 CPUs, 8 GB Ram, 64 GB StorageLoad shared container workloads, Primary PiHole DNS
Docker3Secondary Docker Host on PVE24 CPUs, 8 GB Ram, 64 GB StorageLoad shared container workloads, Secondary PiHole DNS
Docker4Secondary Docker Host on Raspberry Pi4 CPUs, 8 GB Ram, 256 GB StorageBackup DNSLoad shared container workloads, Auxiliary PiHole DNS
Volume StorageSynology HA Storage ClusterDual Synology NAS'; SSD storageSynology High-AvailabilityFacilitates Proxmox HA via shared HA storage and NFS

The Proxmox VMs utilize Proxmox High-Availability features to ensure that no single failure causes our Docker hosts to fail. We are also spreading the VM workload across our three physical servers to improve the capacity and performance of our Docker system.

Our Synology High-Availability storage system stores persistent volumes for our Docker system. This enables high-performance storage for our container volumes, allows configuration file editing, and facilitates backups.

Docker and Docker Compose Setup

We installed Docker and the Docker Compose plugin on our Ubuntu VMs and used the convenience script procedure documented here.

The procedure for installing Docker and the Docker Compose plugin on the Raspberry Pi is covered here.

Mail Forwarding

Containers and other workloads need to be able to send mail. This procedure can enable mail forwarding from inside the host VMs.

Volume Storage

We use our shared high-availability storage pool as a location for persistent volume storage in Docker. This approach makes it easier to edit container configuration files and perform backups.

We access this storage via NFS mounts on our Docker host VMs. This requires that the docker volume share on our HA NAS device be mounted inside the VM running Docker.  The following video explains setting up the necessary NFS client on our Docker VMs.


Set up NFS on Ubuntu

Here are some notes on our installation:

  • It’s essential to get the NFS permissions and user ID mapping correct on the Synology NFS server
  • We used the autofs approach covered in the video to our NFS share (see chapter at 20:08 in the video)
  • We created a script to automate the setup of the NFS client and autofs

Traefik Reverse Proxy and Portainer

We have deployed a combination of Traefik as a reverse proxy and Portainer on our Docker infrastructure. Both of these applications are deployed via a combined Docker Compose .yml file.

Portainer Environment - Setting Public IP
Portainer Environment – Setting Public IP

It is essential to set some details about your docker environment so that the links ports associated with your containers work correctly in the Portainer UI. This should be done for each Docker instance that you manage via Portainer. Configure the Public IP for your Docker instance in Administration / Environment-related / Environments.

The procedure for deploying Traefik is covered here. The steps to add Portainer are covered here.

Raspberry Pi NAS

Raspberry Pi NAS
Raspberry Pi NAS

We’ve built a NAS and Docker environment using a Raspberry Pi 5. Our NAS features a 2 TB NVMe SSD drive for fast shared storage on our network.

Raspberry Pi NAS Hardware Components

Raspberry Pi 5 Single Board Computer

We use the following components to build our system –

Here’s a photo of the completed hardware assembly –

Pi NAS Internals - Raspberry Pi NAS
Pi NAS Internals

Software Components and Installation

We installed the following software on our system to create our NAS –

CassaOS

CasaOS GUI
CasaOS GUI

CasaOS is included to add a very nice GUI for managing each of our NUT servers. Here’s a useful video on how to install CasaOS on the Raspberry Pi –

Installation

The first step is to install the 64-bit Lite Version of Raspberry Pi OS. This is done by first installing a full desktop version on a flash card and then using Raspberry Pi Imager to install the lite version on our NVMe drive.

Once this installation was done, we used the Raspberry Pi Imager to install the same OS version on our NVMe SSD. After removing the flash card and booting to the NVMe SSD, the following configuration changes were made –

  • The system name is set to NAS-11
  • Enabled SSH
  • Set our user ID and password
  • Applied all available updates
  • We updated /boot/firmware/config.txt to enable PCIe Gen3 operation with our SSD

We used the process covered in the video above to install CasaOS.

CasaOS makes all of its shares public and does not password-protect shared folders. While this may be acceptable for home use where the network is isolated from the public Internet, it certainly is not a good security practice.

Fortunately, the Debian Linux-derived distro we are running includes Samba file share support, which we can use to protect our shares properly. This article explains the basics of how to do this.

Here’s an example of the information in smb.conf for one of our shares –

[Public]
    path = /DATA/Public
    browsable = yes
    writeable = Yes
    create mask = 0644
    directory mask = 0755
    public = no
    comment = "General purpose public share"

You will also need to create a Samba user for your Samba shares to work. Samba user privileges can be added to any of the existing Raspberry Pi OS users with the following command –

# sudo smbpasswd -a <User ID to add>

It’s also important to correctly set the shared folder’s owner, group, and modes.

We need to restart the Samba service anytime configuration changes are made. This can be done with the following command –

# sudo systemctl restart smbd

Docker in an LXC Container

Using this procedure, we set up docker using the Turnkey Core LXC container (Debian Linux).

Docker LXC Container Configuration

The container is created with the following resources:

  • 4 CPUs
  • 4096 KB Memory
  • 8 GB SSD Storage (Shared PVE-storage)
  • LS Services Network

Portainer Edge Agent

We manage Docker using a single Portainer instance.

Portainer Management Interface

This is done via the Portainer Edge Agent. The steps to install the Portainer Edge Agent are as follows:

  1. Create a new environment on the Portainer Host
    • Select and use the Portainer edge agent choice
    • BE CAREFUL TO SELECT THE PORTAINER HOST URL, NOT THE AGENT when setting up
  2. Carefully copy the EDGE_ID and  the EDGE_KEY fields into the script in the next step that is used to spin up the edge agent
  3. Install the Portainer Edge Agent on the  docker container as follows:
docker run -d \
-v /var/run/docker.sock:/var/run/docker.sock \
-v /var/lib/docker/volumes:/var/lib/docker/volumes \
-v /:/host \
-v portainer_agent_data:/data \
--restart always \
-e EDGE=1 \
-e EDGE_ID=<replace with id from portainer> \
-e EDGE_KEY=<replace with key from portainer> \
-e EDGE_INSECURE_POLL=1 \
--name portainer_edge_agent \
portainer/agent:latest

Mail Forwarding

More work needs to be done here. Here’s some information to help get started –