This page covers the Proxmox VE install and setup on our server. You can find a great deal of information about Proxmox in the Proxmox VE Administrator’s Guide.
Proxmox Installation/ZFS Storage
Proxmox was installed on our server using the steps in the following video:
The Proxmox boot images are installed on MVMe drives (ZFS RAID1 on our Dell Sever BOSS Card, or ZFS single on the MNVe drives on our Supermicro Servers). This video also covers the creation of a ZFS storage pool and filesystem. A single filesystem called zfsa was set up using RAID10 and lz4 compression using four SSD disks on each server.
A Community Proxmox VE License was purchased and installed for each node. The Proxmox installation was updated on each server using the Enterprise Repository.
Linux Configuration
I like to install a few additional tools to help me manage our Proxmox installations. They include the nslookup and ifconfig commands and the tmux terminal multiplexor. The commands to install these tools are found here.
Cluster Creation
With these steps done, we can create a 3-node cluster. See our Cluster page for details.
ZFS Snapshots
Creating ZFS snapshots of the Proxmox installation can be useful before making changes. This enables rollback to a previous version of the filesystem should any changes need to be undone. Here are some useful commands for this purpose:
zfs list -t snapshot
zfs list
zfs snapshot rpool/ROOT/<node-name>@<snap-name>
zfs rollback rpool/ROOT/<node-name>t@<snap-name>
zfs destroy rpool/ROOT/<node-name>@<snap-name>
Be careful to select the proper dataset – snapshots on the pool that contain the dataset don’t support this use case. Also, you can only roll back to the latest snapshot directly. If you want to roll back to an earlier snapshot, you must first destroy all of the later snapshots.
In the case of a Proxmox cluster node, the shared files in the associated cluster filesystem will not be included in the snapshot. You can learn more about the Proxmox cluster file system and its shared files here.
You can view all of the snapshots inside the invisible /.zfs directory on the host filesystem as follows:
# cd /.zfs/snapshot/<name>
# ls -la
Local NTP Servers
We want Proxmox and Proxmox Backup Server to use our local NTP servers for time synchronization. To do this, we need to modify /etc/chrony/chrony.conf to use our servers for the pool. This needs to be done on each server individually and inside the Proxmox Backup Server VM. See the following page for details.
The first step before following the configuration procedures above is to install chrony on each node –
apt install chrony
Mail Forwarding
We used the following procedure to configure postfix to support forwarding e-mail through smtp2go. Postfix does not seem to work with passwords containing a $ sign. A separate login was set up in smtp2go for forwarding purposes.
Some key steps in the process include:
# Install postfix and the supporting modules
# for smtp2go forwarding
sudo apt-get install postfix
sudo apt-get install libsasl2-modules

# Install mailx
sudo apt -y install bsd-mailx
sudo apt -y install mailutils

# Run this command to configure postfix
# per the procedure above
sudo dpkg-reconfigure postfix

# Use a working prototype of main.cf to edit
sudo vi /etc/postfix/main.cf

# Setup /etc/mailname -
#   use version from working server
#   MAKE SURE mailname is lower case/matches DNS
sudo uname -n > /etc/mailname

# Restart postfix
sudo systemctl reload postfix
sudo service postfix restart

# Reboot may be needed
sudo reboot

# Test
echo "Test" | mailx -s "PVE email" <email addr>
Disabling Enterprise Repository
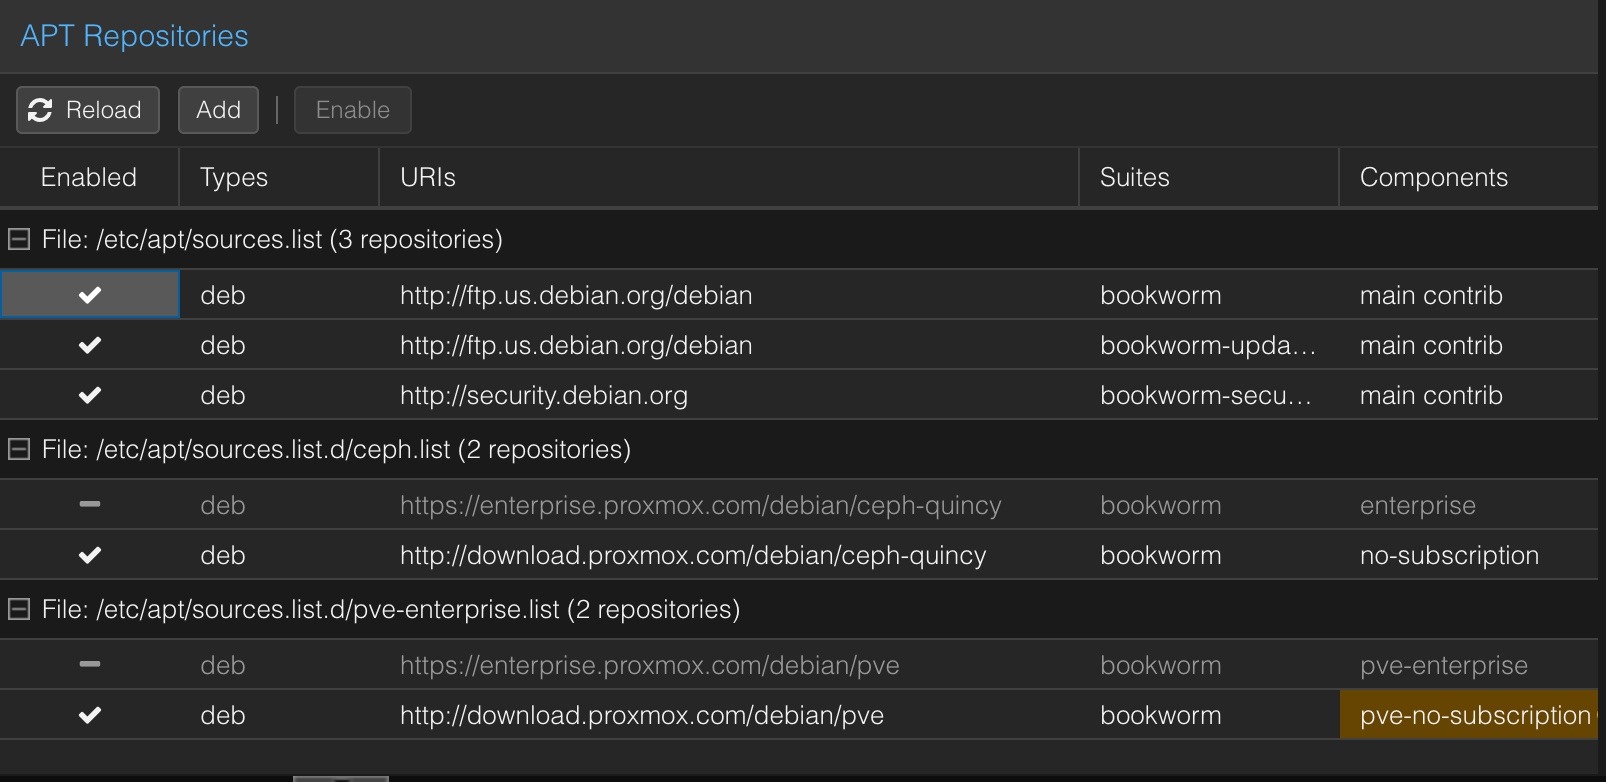
We recommend purchasing at least a Community Support License for production Proxmox servers. We are running some test servers here and we have chosen to use the No Subscription repositories for these systems. The following videos explain how to configure the No Subscription repositories. These procedures work with Proxmox 8.3.
Explains how to configure the No Subscription repositories
Disable the No Subscription warning messages
Problems with Out-of-Date Keys on Server Nodes
I have occasionally encountered issues with SSH keys becoming outdated on our servers. The solution is to run the following commands on all servers. A reboot is also sometimes necessary.
# Update certs and repload PVE proxy
pvecm updatecerts -F && systemctl restart pvedaemon pveproxy

# Reboot if needed
reboot
DNS Performance Improvements
Some proxmox components can do DNS lookups at high rates. Some things that help with this include:
- Using IP addresses instead of DNS names for NFS shares in /etc/pv/storage.cfg
- Setting high-use DNS names like ‘pbs.your-domain‘ in /etc/hosts (you’ll need to do this for each node in your cluster)
- If you use the Metrics Server feature in Datacenter, you’ll want to use an IP address instead of a DNS name to access your metrics database.