The Networking configuration on our test node mirrors the setup in our Production Cluster. The table above outlines the Staging Cluster Node networking setup. A single LACP Bond (2 x 2.5 GbE) is shared between the Services and Storage vmbr’s.
Storage Configuration
Staging Node Storage Configuration
The table above shows the storage configuration for our Staging Cluster Nodes. PVE-Storage is implemented on our high-availability NAS.
Proxmox Backup Server Configuration
Backups for our Staging Cluster Nodes mirror the configuration and scheduling of Backups on our production Cluster (more info here).
Additional Configuration
The following additional items are configured for our Staging cluster nodes:
Community License to enable access to Enterprise Repositories
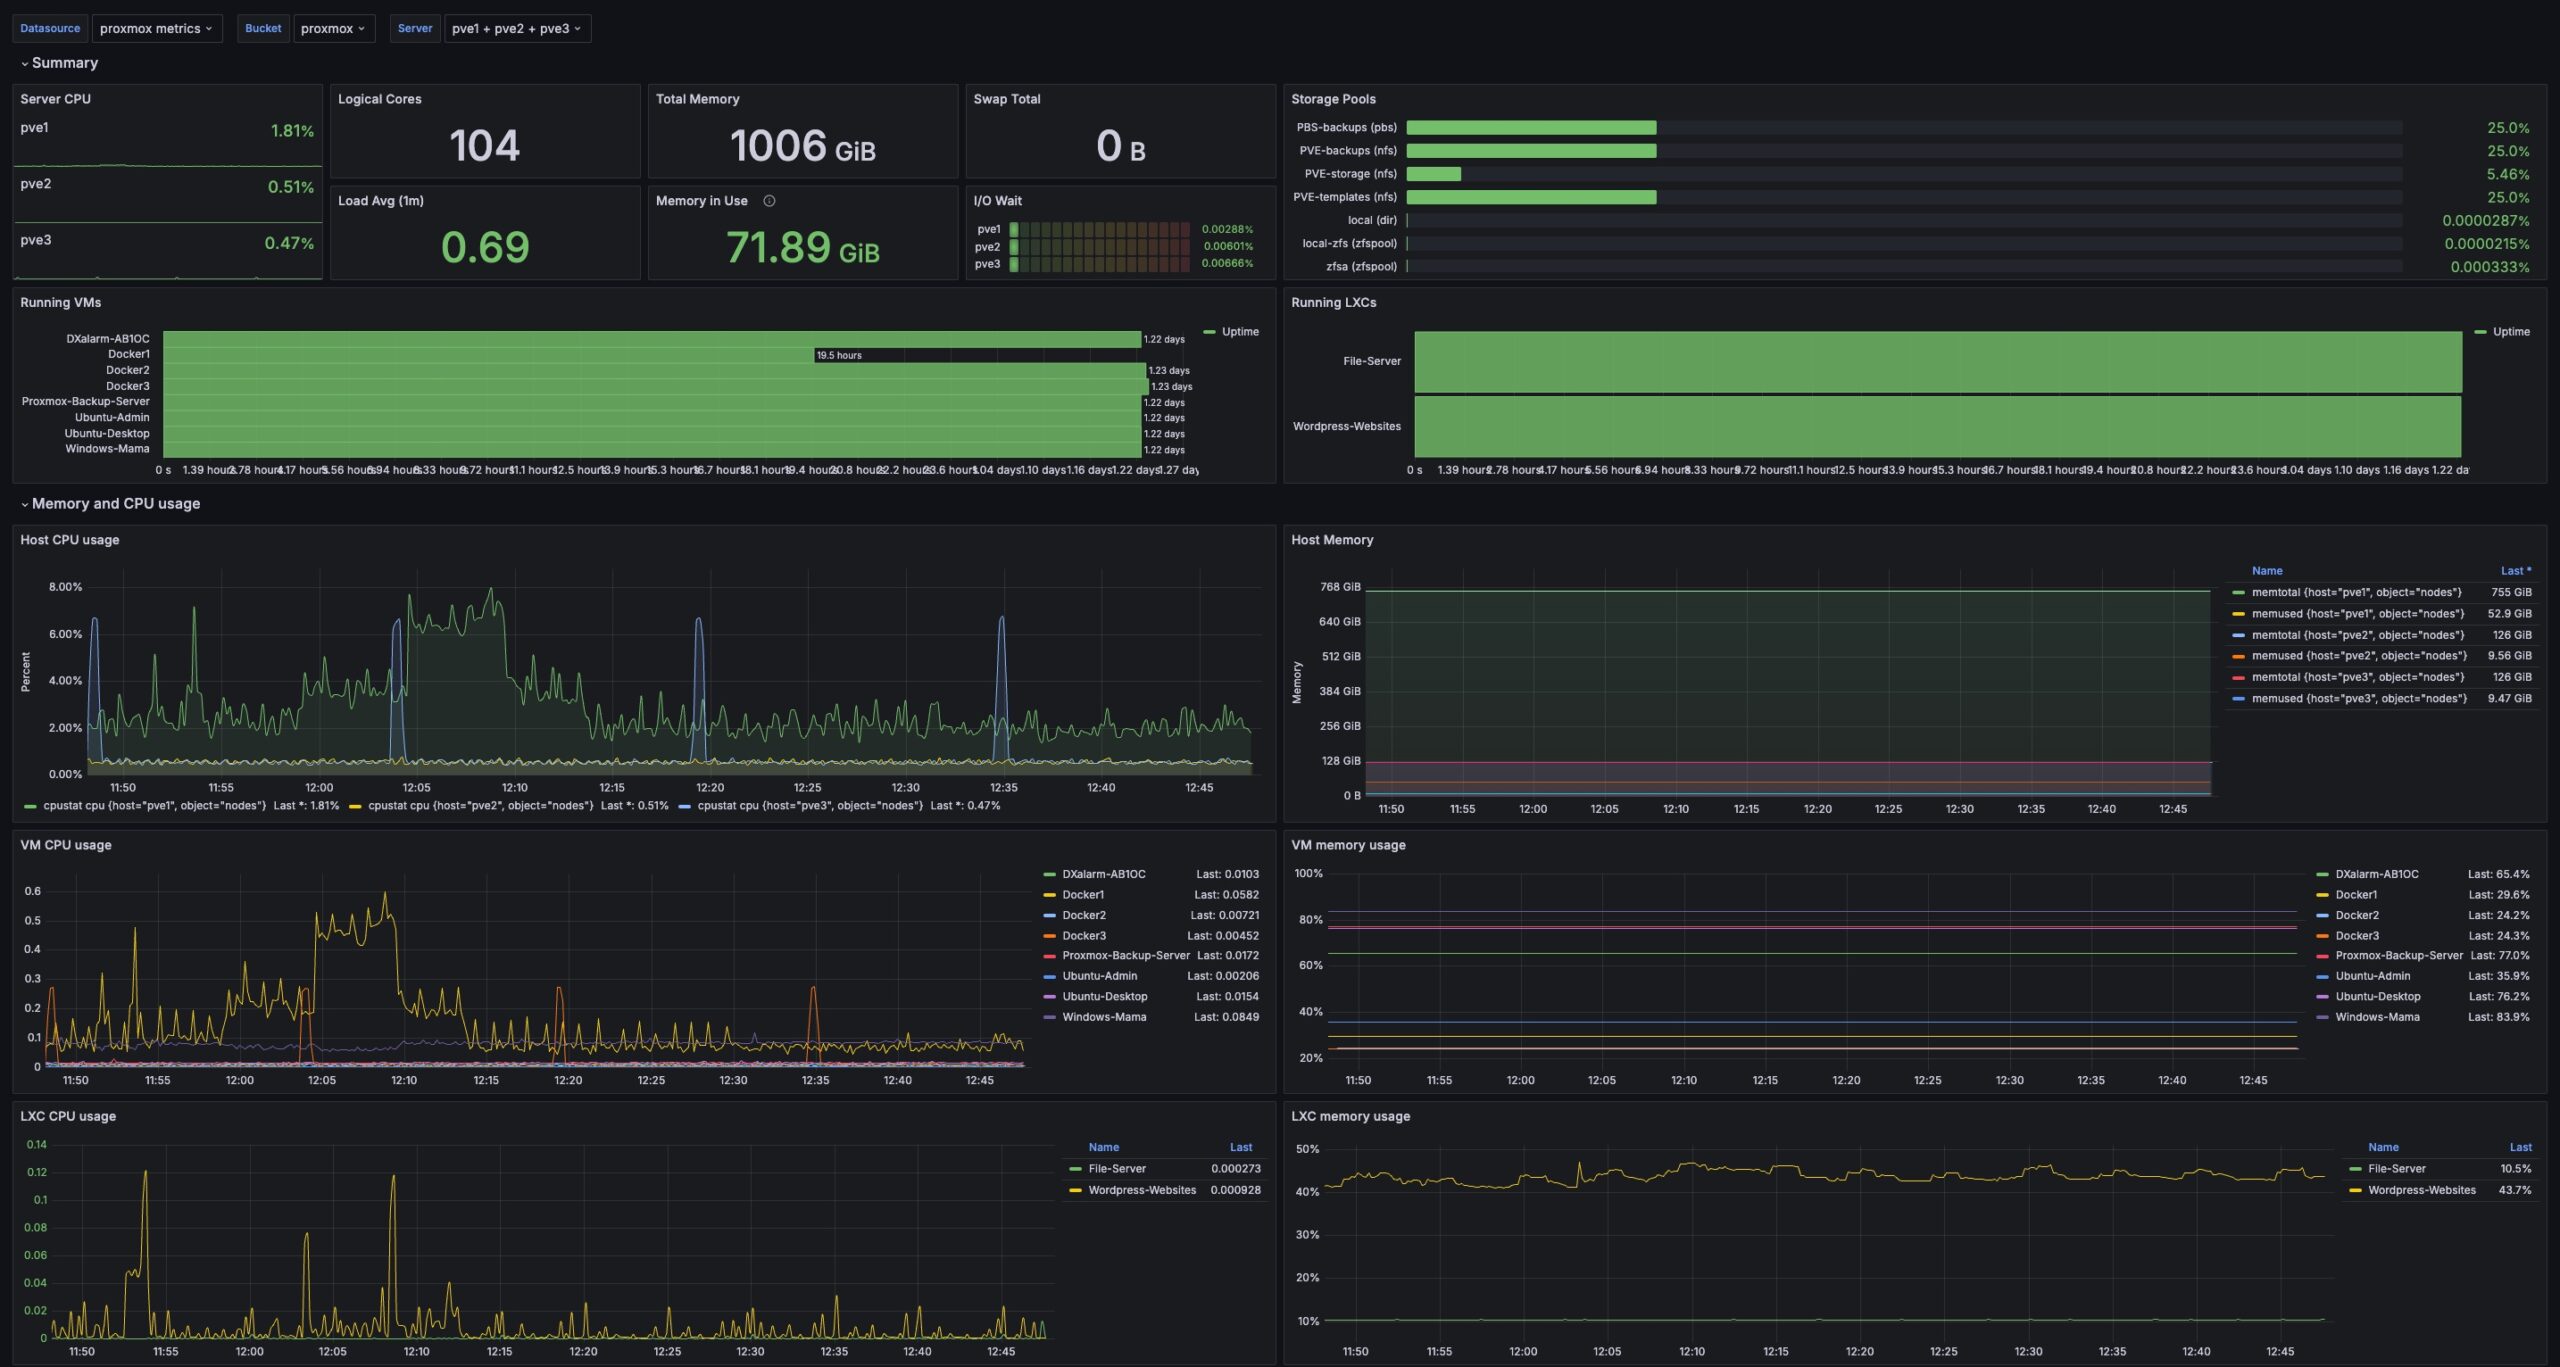
The following sections cover the setup and configuration of our monitoring stack.
Proxmox Monitoring Setup
The following video explains how to set up a Grafana dashboard for Proxmox. This installation uses the monitoring function built into Proxmox to feed data to Influx DB.
And here is a video that explains setting up self-signed certificates –
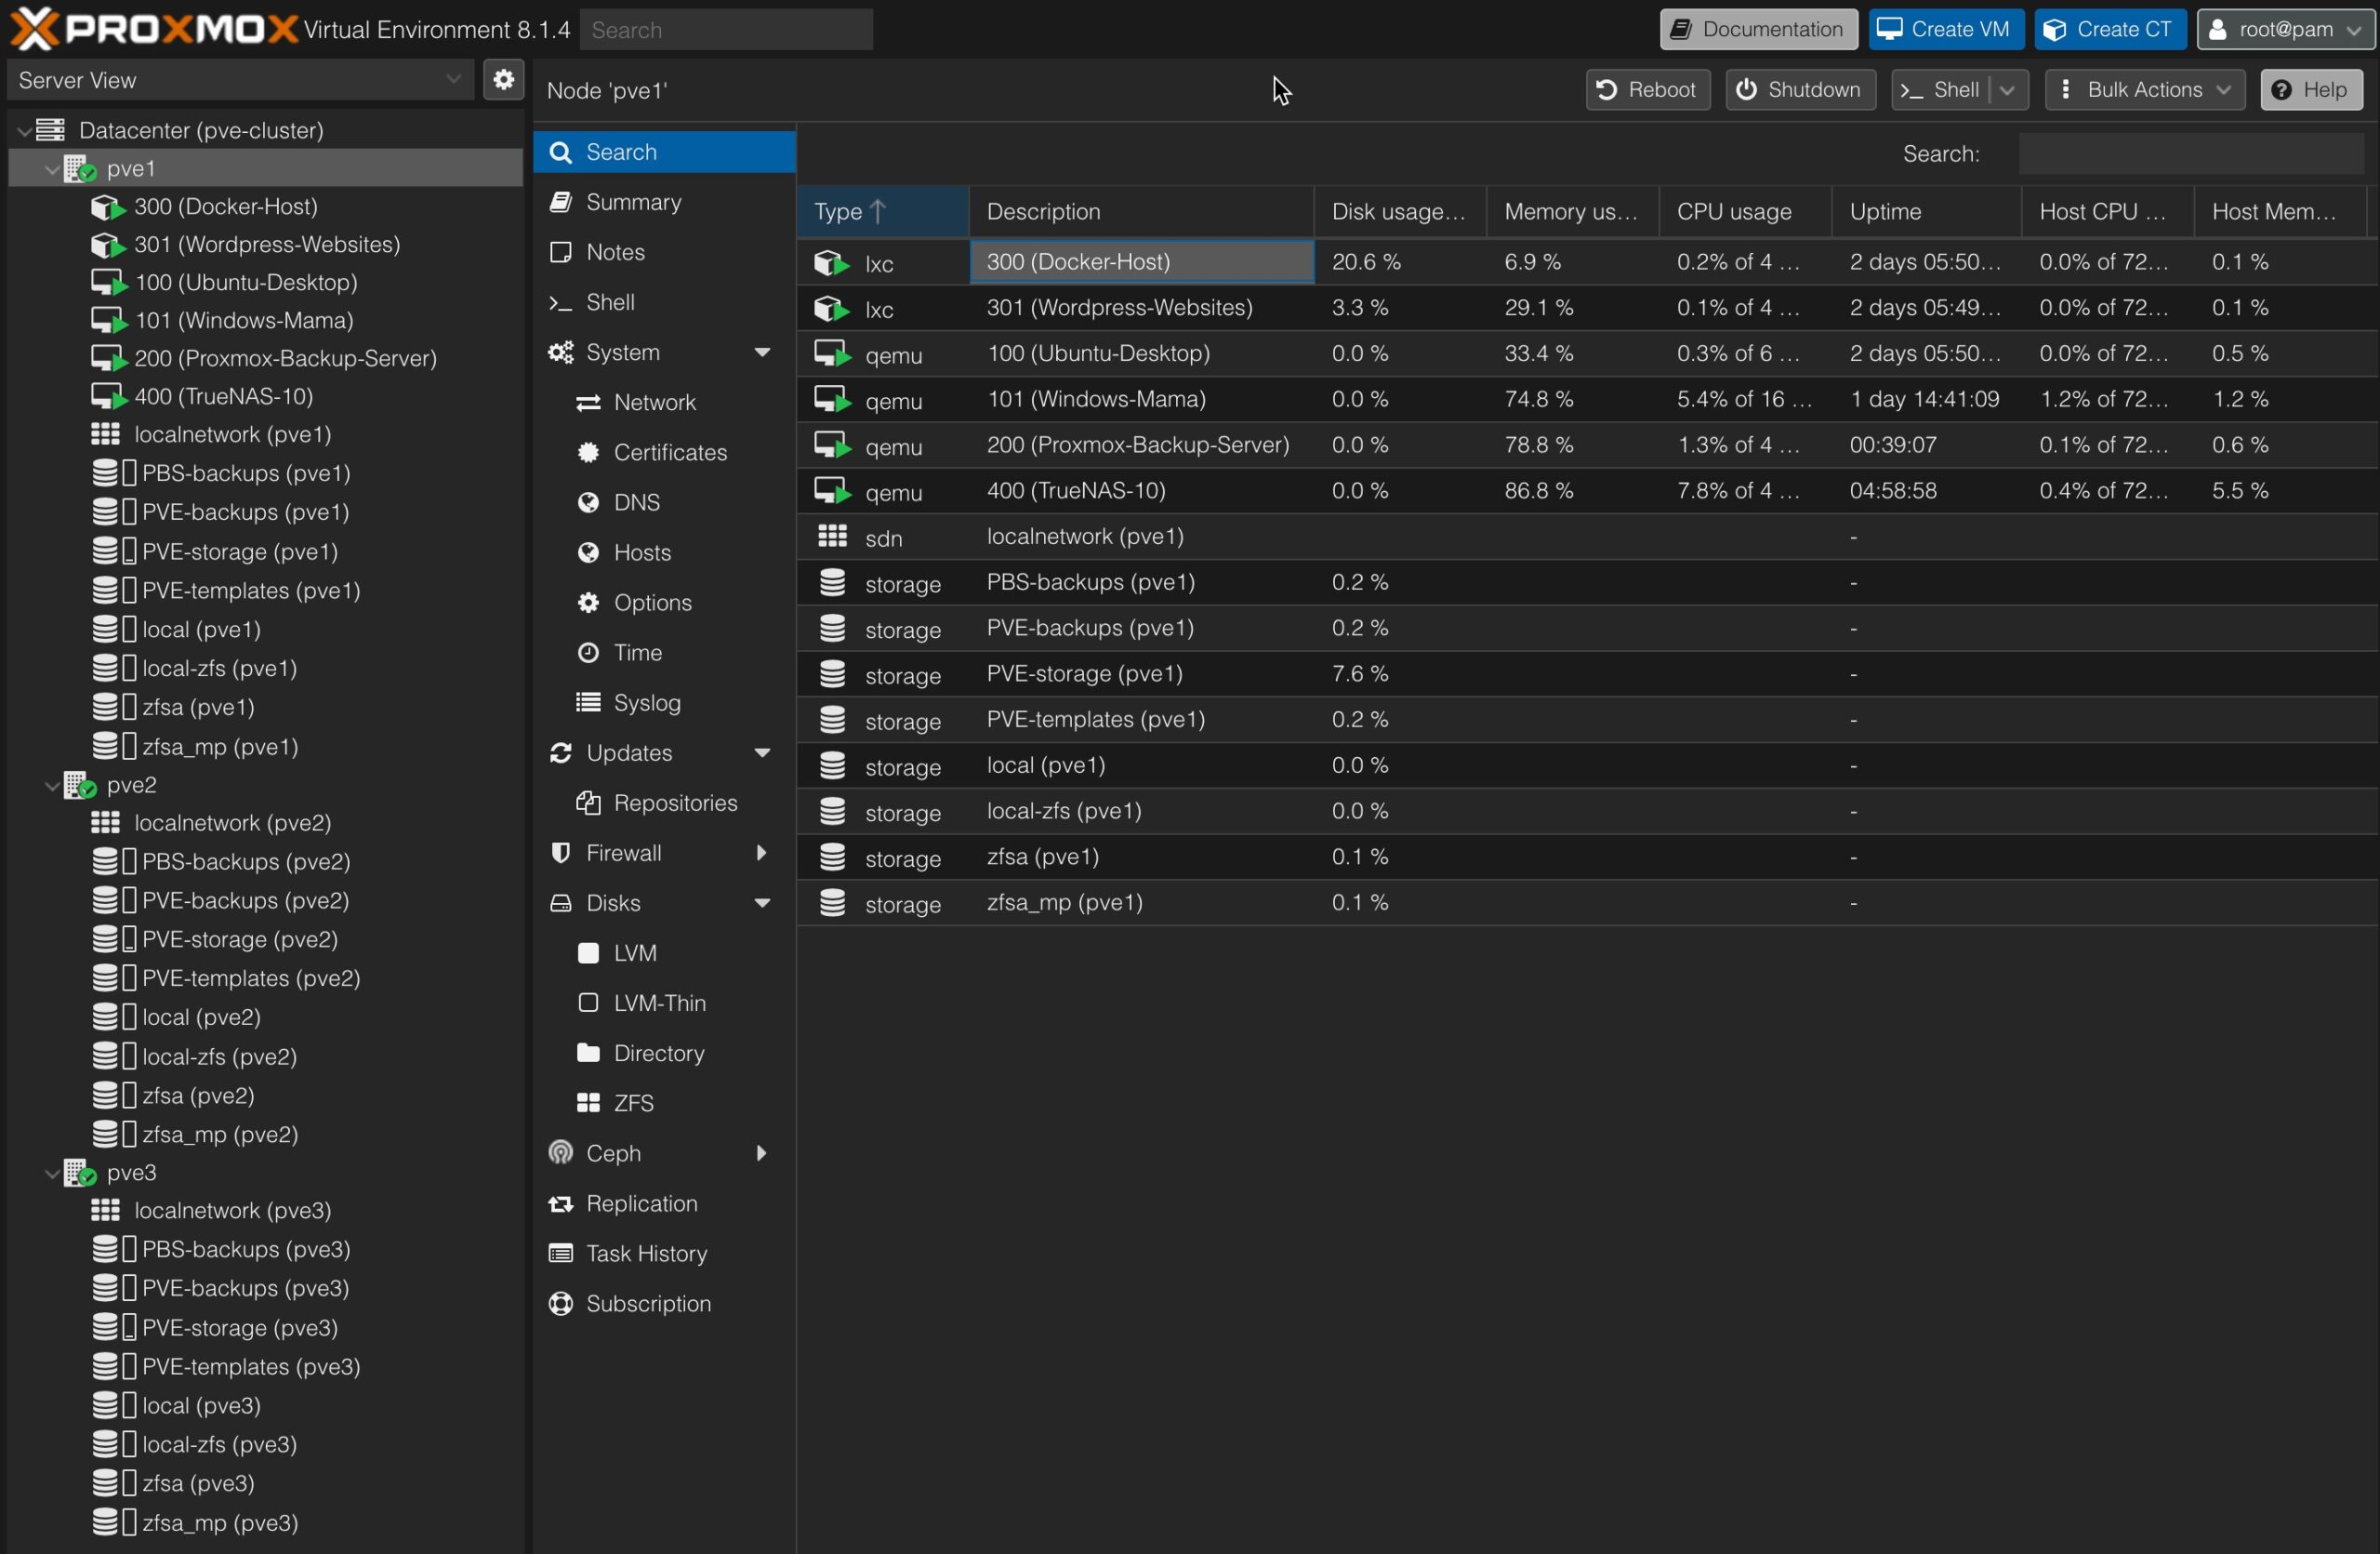
Our production Proxmox cluster consists of three servers. Our approach was to pair one high-capacity server (a Dell R740 dual-socket machine) with two smaller Supermicro servers.
Node
Model
CPU
RAM
Storage
OOB Mgmt.
Network
pve1
Dell R740
2 x Xeon Gold 6154 3.0 GHz
(72 CPUs)
768 GB
16 x 3.84 TB SSDs
iDRAC
2 x 10 GbE,
2 x 25 GbE
pve2
Supermicro 5018D-FN4T
Xeon D-1540 2.0 GHz
(16 CPUs)
128GB
2 x 7.68 TB SSDs
IPMI
2 x 1 GbE,
4 x 10 GbE
pve3
Supermicro 5018D-FN4T
Xeon D-1540 2.0 GHz
(16 CPUs)
128 GB
2 x 7.68 TB SSDs
IPMI
2 x 1 GbE,
4 x 10 GbE
Cluster Servers
This approach allows us to handle most of our workloads on the high-capacity server, leverage HA availability, and move workloads to the smaller servers to prevent downtime during maintenance.
Server Networking Configuration
All three servers in our cluster have similar networking interfaces consisting of:
An OOB management interface (iDRAC or IPMI)
Two low-speed ports (1 GbE or 10 GbE)
Two high-speed ports (10 GbE or 25 GbE)
PVE2 and PVE3 each have an additional two high-speed ports (10 GbE) via an add-on NIC
The following table shows the interfaces on our three servers and how they are mapped to the various functions available via a standard set of bridges on each server.
Cluster Node
OOB Mgmt.
PVE Mgmt.
Services (VLAN Aware)
Storage Svcs.
pve1 (R740)
1 GbE iDRAC
10 GbE Port 1 & 2 (Bond)
25 GbE Port 1
25 GbE Port 2
pve2 (5018D-FN4T)
1 GbE IPMI
1 GbE Port 1 & 2 (Bond)
10 GbE Ports 1 & 2 (Bond)
10 GbE Ports 3 & 4 (Bond)
pve3 (5018D-FN4T)
1 GbE IPMI
1 GbE Port 1 & 2 (Bond)
10 GbE Ports 1 & 2 (Bond)
10 GbE Ports 3 & 4 (Bond)
Each machine uses a combination of interfaces and bridges to realize a standard networking setup. We also use LACP Bonds to provide higher capacity for the management, service, and storage bridges.
You can see how we configured the LACP Bond interfaces in this video.
Network Bonding on Proxmox
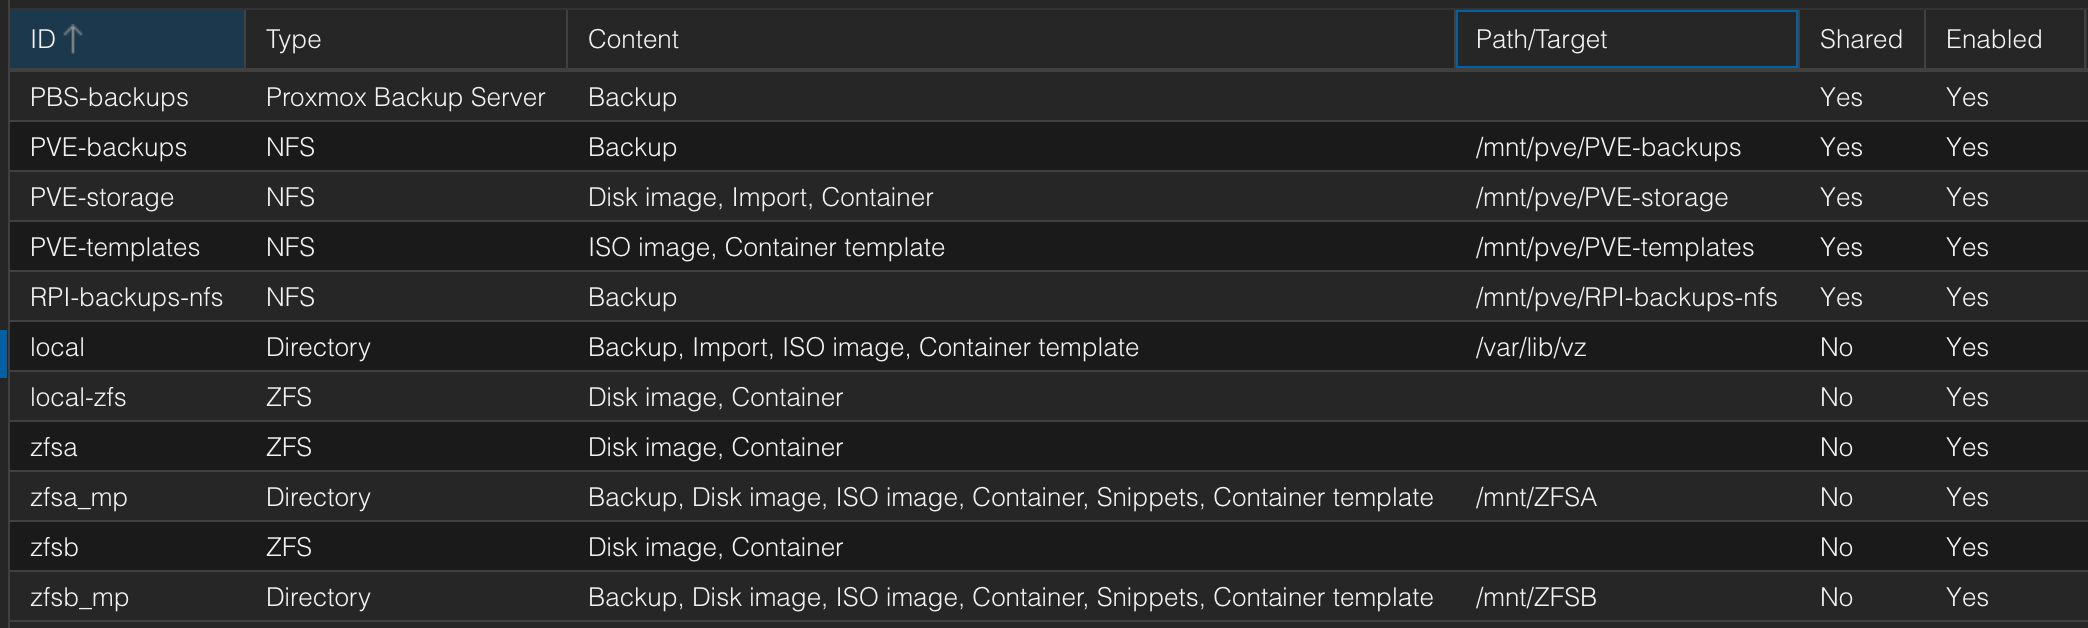
Storage Configuration
Production Cluster Storage Configuration
The table above shows the storage configuration for our Production Cluster Nodes. TPVE-Storage is implemented on our high-availability NAS.We must add specific routes to ensure the separate Storage VLAN is used for Virtual Disk I/O. This is done via the following adjustments to the vmbr3 bridge in /etc/network/interfaces.
Finally, we use the target NAS’s IP address on the Storage VLAN when configuring the NFS share for PVE-storage. This ensures that the dedicated Storage VLAN will be used for Virtual Disk I/O by all nodes in our Proxmox Cluster. We ran
# traceroute <storage NAS IP>
from each of our servers to confirm that we have a direct LAN connection to PVE-Storage, not through our router.
Cluster Setup
We are currently running a three-server Proxmox cluster. Our servers consist of:
A Dell R740 Server
Two Supermicro 5018D-FN4T Servers
The first step was to prepare each server in the cluster as follows:
Install and configure Proxmox
Set up a standard networking configuration
Confirm that all servers can ping the shared storage NAS using the storage VLAN
We used the procedure in the following video to set up and configure our cluster –
The first step was to use the pve1 server to create a cluster. Next, we add the other servers to the cluster. If there are problems connecting to shared stores, check the following:
Is the Storage VLAN connection using an address like 192.168.100.<srv>/32?
Is there a direct route for VLAN 1000 (Storage) that does not use the router? Check via traceroute <storage-addr>
Is the target NAS drive sitting on the Storage VLAN with multiple gateways enabled
Can you ping the storage server from inside the Proxmox server instances?
Backups
For backups to work correctly, we need to modify the Proxmox /etc/vzdump.conf file to set the tmpdir to /var/tmp/ as follows:
# vzdump default settings
tmpdir: /var/tmp/
#tmpdir: DIR#dumpdir: DIR
...
This will cause our backups to use the Proxmox tmp file directory to create backup archives for all backups.
We later upgraded to Proxmox Backup Server. You can see how PBS was installed and configured here.
NFS Backup Mount
We set up an NFS backup mount on one of our NAS drives to store Proxmox backups.
An NFS share was set up on NAS-5 as follows:
Share PVE-backups (/volume2/PVE-backups)
Used the default Management Network
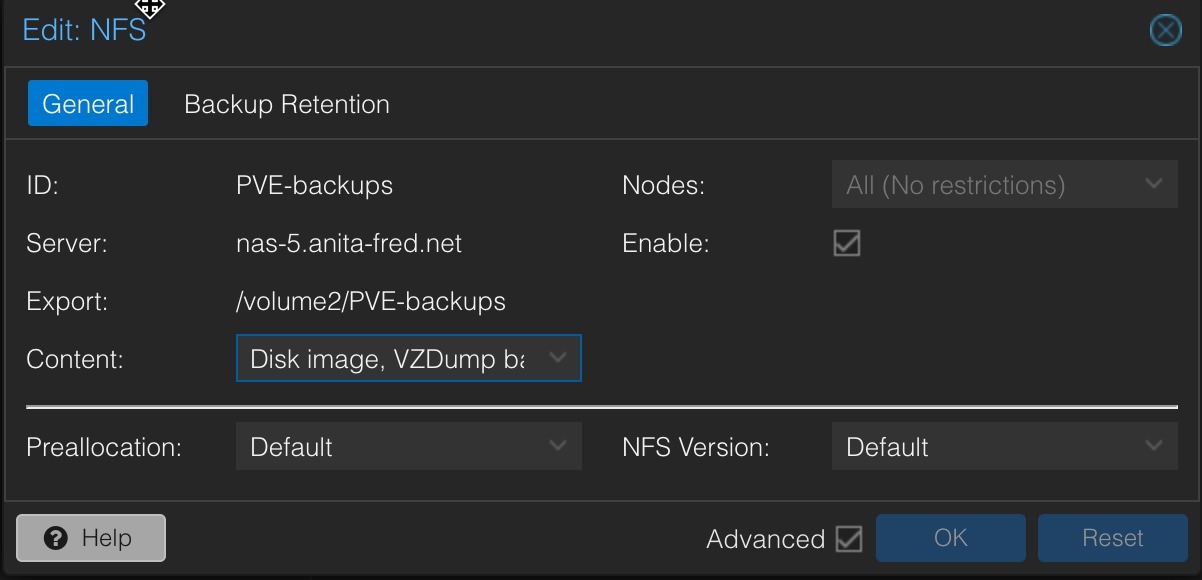
A Storage volume was configured in Proxmox to use for backups as follows:
NAS-5 NFS Share for PVE Backups
A Note About DNS Load
Proxmox constantly performs DNS lookups for servers associated with NFS and other mounted filesystems, which can result in very high transaction loads on our DNS servers. To avoid this problem, we replaced the server domain names with the associated IP addresses. Note that this cannot be done for the virtual mount for the Proxmox Backup Server, as PBS uses a certificate to validate the domain name used to access it. These adjustments can be made by editing the storage configuration file at /etc/pve/storage.cfg on any node in the cluster (changes in this file are synced for all nodes).
NFS Virtual Disk Mount
We also created an NFS share for VM and LXC virtual disk storage. The volume chosen provides high-speed SSD storage on a dedicated Storage VLAN.
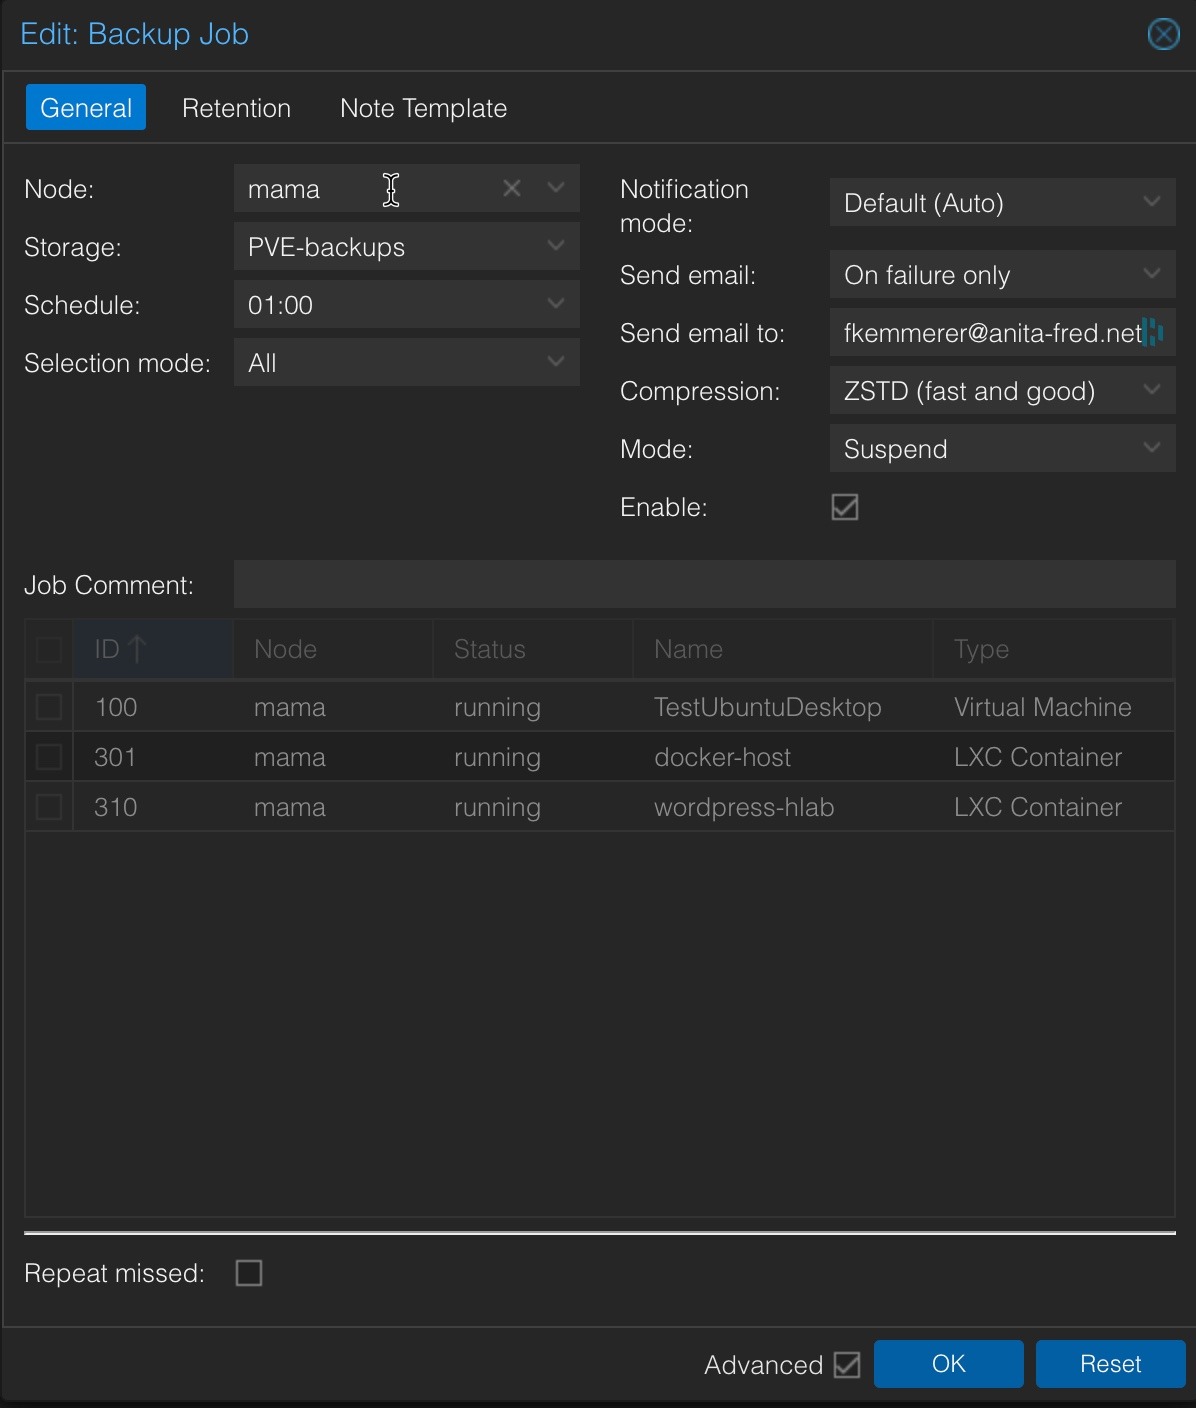
Global Backup Job
A Datacenter-level backup job was set up to run daily at 1 am for all VMs and containers as follows (this was later replaced with Proxmox Backup Server backups as explained here):
Proxmox Backup Job
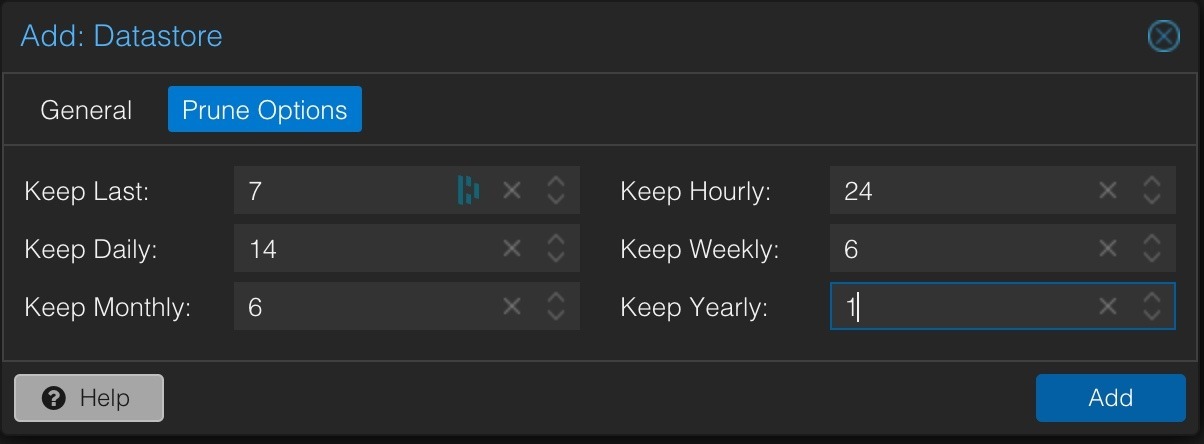
The following retention policy was used:
Proxmox Backup Retention Policy
Node File Backups
We installed the Proxmox Backup Client on each of our server nodes and created a cron job that backs up files on each node to our Proxmox Backup Server daily. The following video explains how to install and configure the PBS client.
For the installation to work properly, the locations of the PBS repository and access credentials must be set in both the script and the login bash shell. We also need to create a cron job to run the backup script daily.
SSL Certificates
We use the procedure in the video below to set up signed SSL certificates for our three server nodes and the Proxmox Backup server.
This approach uses a Let’s Encrypt DNS-01 challenge via Cloudflare DNS to authenticate with Let’s Encrypt and obtain a signed certificate for each server node in the cluster and for PBS.
SSH Keys
A public/private key pair is created and configured for Proxmox VE and all VMs and LXC containers to ensure secure SSH access. The following procedure is used to do this. The public keys are installed on each server using the ssh-copy-id command, e.g., ssh-copy-id username@host.
Remote Syslog
Sending logs to a remote syslog server requires the manual installation of the rsyslog service as follows –
# apt update && apt install rsyslog
Once the service is installed, you can create the following file to set the address of your remote Syslog server –
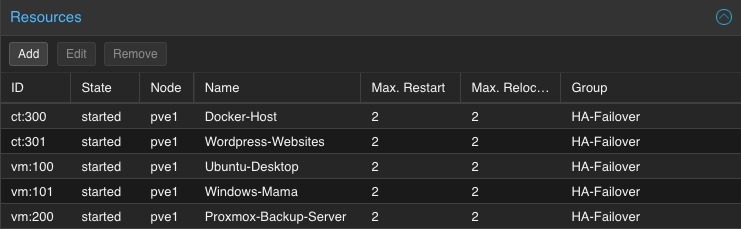
Move the virtual disks for all VMs and LXC containers to shared storage. In our case, this is PVE-storage. Note that our TrueNAS VM must run on pve1, as it uses disks available only on pve1.
Enable HA for all VMs and LXCs (except TrueNAS)
Set up an HA group to govern where the VMs and LXC containers migrate to if a node fails
Cluster Failover Configuration – VMs & LXCs
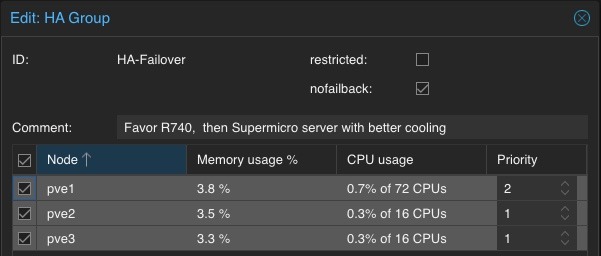
We generally run all of our workloads on pve1 since it is our cluster’s highest-performance and capacity node. Should this node fail, we want to migrate the pve1 workload to distribute it evenly across the pve2 and pve3 nodes. We can do this by setting up an HA Failover Group as follows:
HA Failover Group Configuration
The nofallback option is not set, so workloads will automatically migrate back to pve1 when we manually migrate them to other nodes to support maintenance operations.
Software-Defined Networking
We configured Software-Defined Networking (SDN) for our Proxmox cluster using the procedure in the following video –
Proxmox SDB Configuration
These capabilities will be useful for future projects, including those that involve multiple clusters and multiple sites.
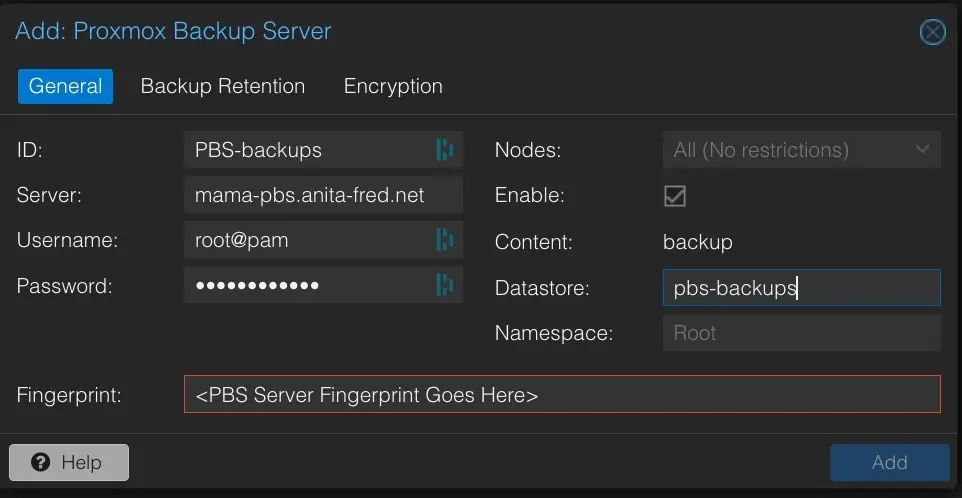
This page covers the installation of the Proxmox Backup Server (PBS) in our HomeLab. We run the PBS in a VM on our server and store backups in shared storage on one of our NAS drives.
Make the NAS share mount permanent by adding it to /etc/fstab
vi /etc/fstab
...after the last line add the following line
# Mount PBS backup store from NAS
//nas-#.anita-fred.net/PBS-backups /mnt/pbs-store cifs vers=3.0,credentials=/etc/samba/.smbcreds,uid=backup,gid=backup,defaults 0 0
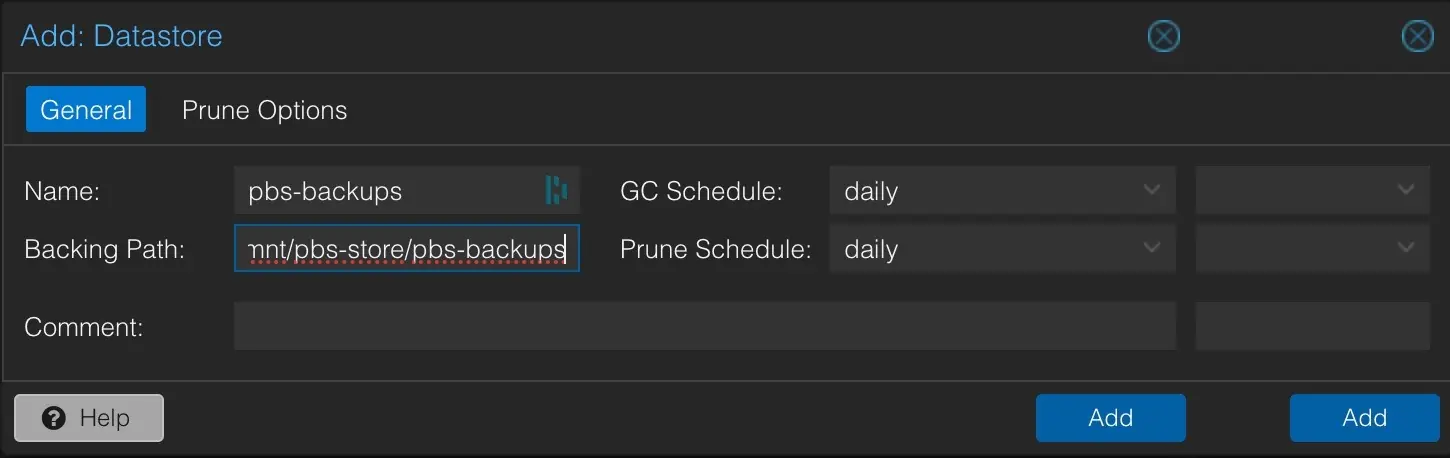
Create a datastore to hold the PBS backups in the Proxmox Backup Server as follows. The datastore will take some time to create (be patient).
The NFS share for the Proxmox Backup store needs time to start before the Backup server starts on boot. This can be set for each node under System/Options/Start on Boot delay. A 30-second delay seems to work well.
Setup Backup, Pruning, and Garbage Collection
The overall schedule for Proxmox backup operations is as follows:
02:00 – Run a PVE Backup on the PBS Backup Server VM from our Production Cluster (run in suspend mode; stop mode causes problems)
02:30 – Run PBS Backups in all Clusters/Nodes on all VMs and LXCs EXCEPT for the PBS Backup Server VM
03:00 – Run Pruning on the all PBS datastores
03:30 – Run Garage Collection on all PBS datastores
05:00 – Verify all backups in all PBS G
Local NTP Servers
We want Proxmox and Proxmox Backup Server to use our local NTP servers for time synchronization. To do this, modify/etc/chrony/chrony.conf to use our servers for the pool. This must be done on each server individually and inside the Proxmox Backup Server VM. See the following page for details.
Backup Temp Directory
Proxmox backups use vzdump to create compressed backups. By default, backups use /var/tmp, which lives on the boot drive of each node in a Proxmox Cluster. To ensure adequate space for vzdump and reduce the load on each server’s boot drive, we have configured a temp directory on the local ZFS file systems on each of our Proxmox servers. The tmp directory configuration needs to be done on each node in the cluster (details here). The steps to set this up are as follows:
# Create a tmp directory on local node ZFS stores
# (do this once for each server in the cluster)
cd /zfsa
mkdir tmp

# Turn on and verify ACL for ZFSA store
zfs get acltype zfsa
zfs set acltype=posixacl zfsa
zfs get acltype zfsa

# Configure vzdump to use the ZFS tmp dir'
# add/set tmpdir as follows
# (do on each server)
cd /etc
vi vzdump.conf
tmpdir: /zfsa/tmp
:wq